项目
介绍
🌐 Introduction
项目是使用相同配置运行的一组逻辑测试。我们使用项目是为了能够在不同的浏览器和设备上运行测试。项目在 playwright.config.ts 文件中配置,配置完成后,你可以在所有项目上运行测试,也可以仅在特定项目上运行测试。你还可以使用项目在不同配置下运行相同的测试。例如,你可以在登录和未登录状态下运行相同的测试。
🌐 A project is logical group of tests running with the same configuration. We use projects so we can run tests on different browsers and devices. Projects are configured in the playwright.config.ts file and once configured you can then run your tests on all projects or only on a specific project. You can also use projects to run the same tests in different configurations. For example, you can run the same tests in a logged-in and logged-out state.
通过设置项目,你还可以运行一组具有不同超时或重试的测试,或者针对不同环境(例如登台和生产、按包/功能拆分测试等)运行一组测试。
🌐 By setting up projects you can also run a group of tests with different timeouts or retries or a group of tests against different environments such as staging and production, splitting tests per package/functionality and more.
为多个浏览器配置项目
🌐 Configure projects for multiple browsers
通过使用项目,你可以在多种浏览器(如Chromium、webkit和firefox)以及品牌浏览器如Google Chrome和Microsoft Edge上运行测试。Playwright也可以在模拟平板和移动设备上运行。请参阅[设备参数注册表](https://github.com/microsoft/playwright/blob/main/packages/playwright-core/src/server/deviceDescriptorsSource.json)以获取部分桌面、平板和移动设备的完整列表。
🌐 By using projects you can run your tests in multiple browsers such as chromium, webkit and firefox as well as branded browsers such as Google Chrome and Microsoft Edge. Playwright can also run on emulated tablet and mobile devices. See the registry of device parameters for a complete list of selected desktop, tablet and mobile devices.
import { defineConfig, devices } from '@playwright/test';

export default defineConfig({
  projects: [
    {
      name: 'chromium',
      use: { ...devices['Desktop Chrome'] },
    },

    {
      name: 'firefox',
      use: { ...devices['Desktop Firefox'] },
    },

    {
      name: 'webkit',
      use: { ...devices['Desktop Safari'] },
    },

    /* Test against mobile viewports. */
    {
      name: 'Mobile Chrome',
      use: { ...devices['Pixel 5'] },
    },
    {
      name: 'Mobile Safari',
      use: { ...devices['iPhone 12'] },
    },

    /* Test against branded browsers. */
    {
      name: 'Microsoft Edge',
      use: {
        ...devices['Desktop Edge'],
        channel: 'msedge'
      },
    },
    {
      name: 'Google Chrome',
      use: {
        ...devices['Desktop Chrome'],
        channel: 'chrome'
      },
    },
  ],
});
运行项目
🌐 Run projects
Playwright 将默认运行所有项目。
🌐 Playwright will run all projects by default.
npx playwright test

Running 7 tests using 5 workers

  ✓ [chromium] › example.spec.ts:3:1 › basic test (2s)
  ✓ [firefox] › example.spec.ts:3:1 › basic test (2s)
  ✓ [webkit] › example.spec.ts:3:1 › basic test (2s)
  ✓ [Mobile Chrome] › example.spec.ts:3:1 › basic test (2s)
  ✓ [Mobile Safari] › example.spec.ts:3:1 › basic test (2s)
  ✓ [Microsoft Edge] › example.spec.ts:3:1 › basic test (2s)
  ✓ [Google Chrome] › example.spec.ts:3:1 › basic test (2s)
使用 --project 命令行选项运行单个项目。
🌐 Use the --project command line option to run a single project.
npx playwright test --project=firefox

Running 1 test using 1 worker

  ✓ [firefox] › example.spec.ts:3:1 › basic test (2s)
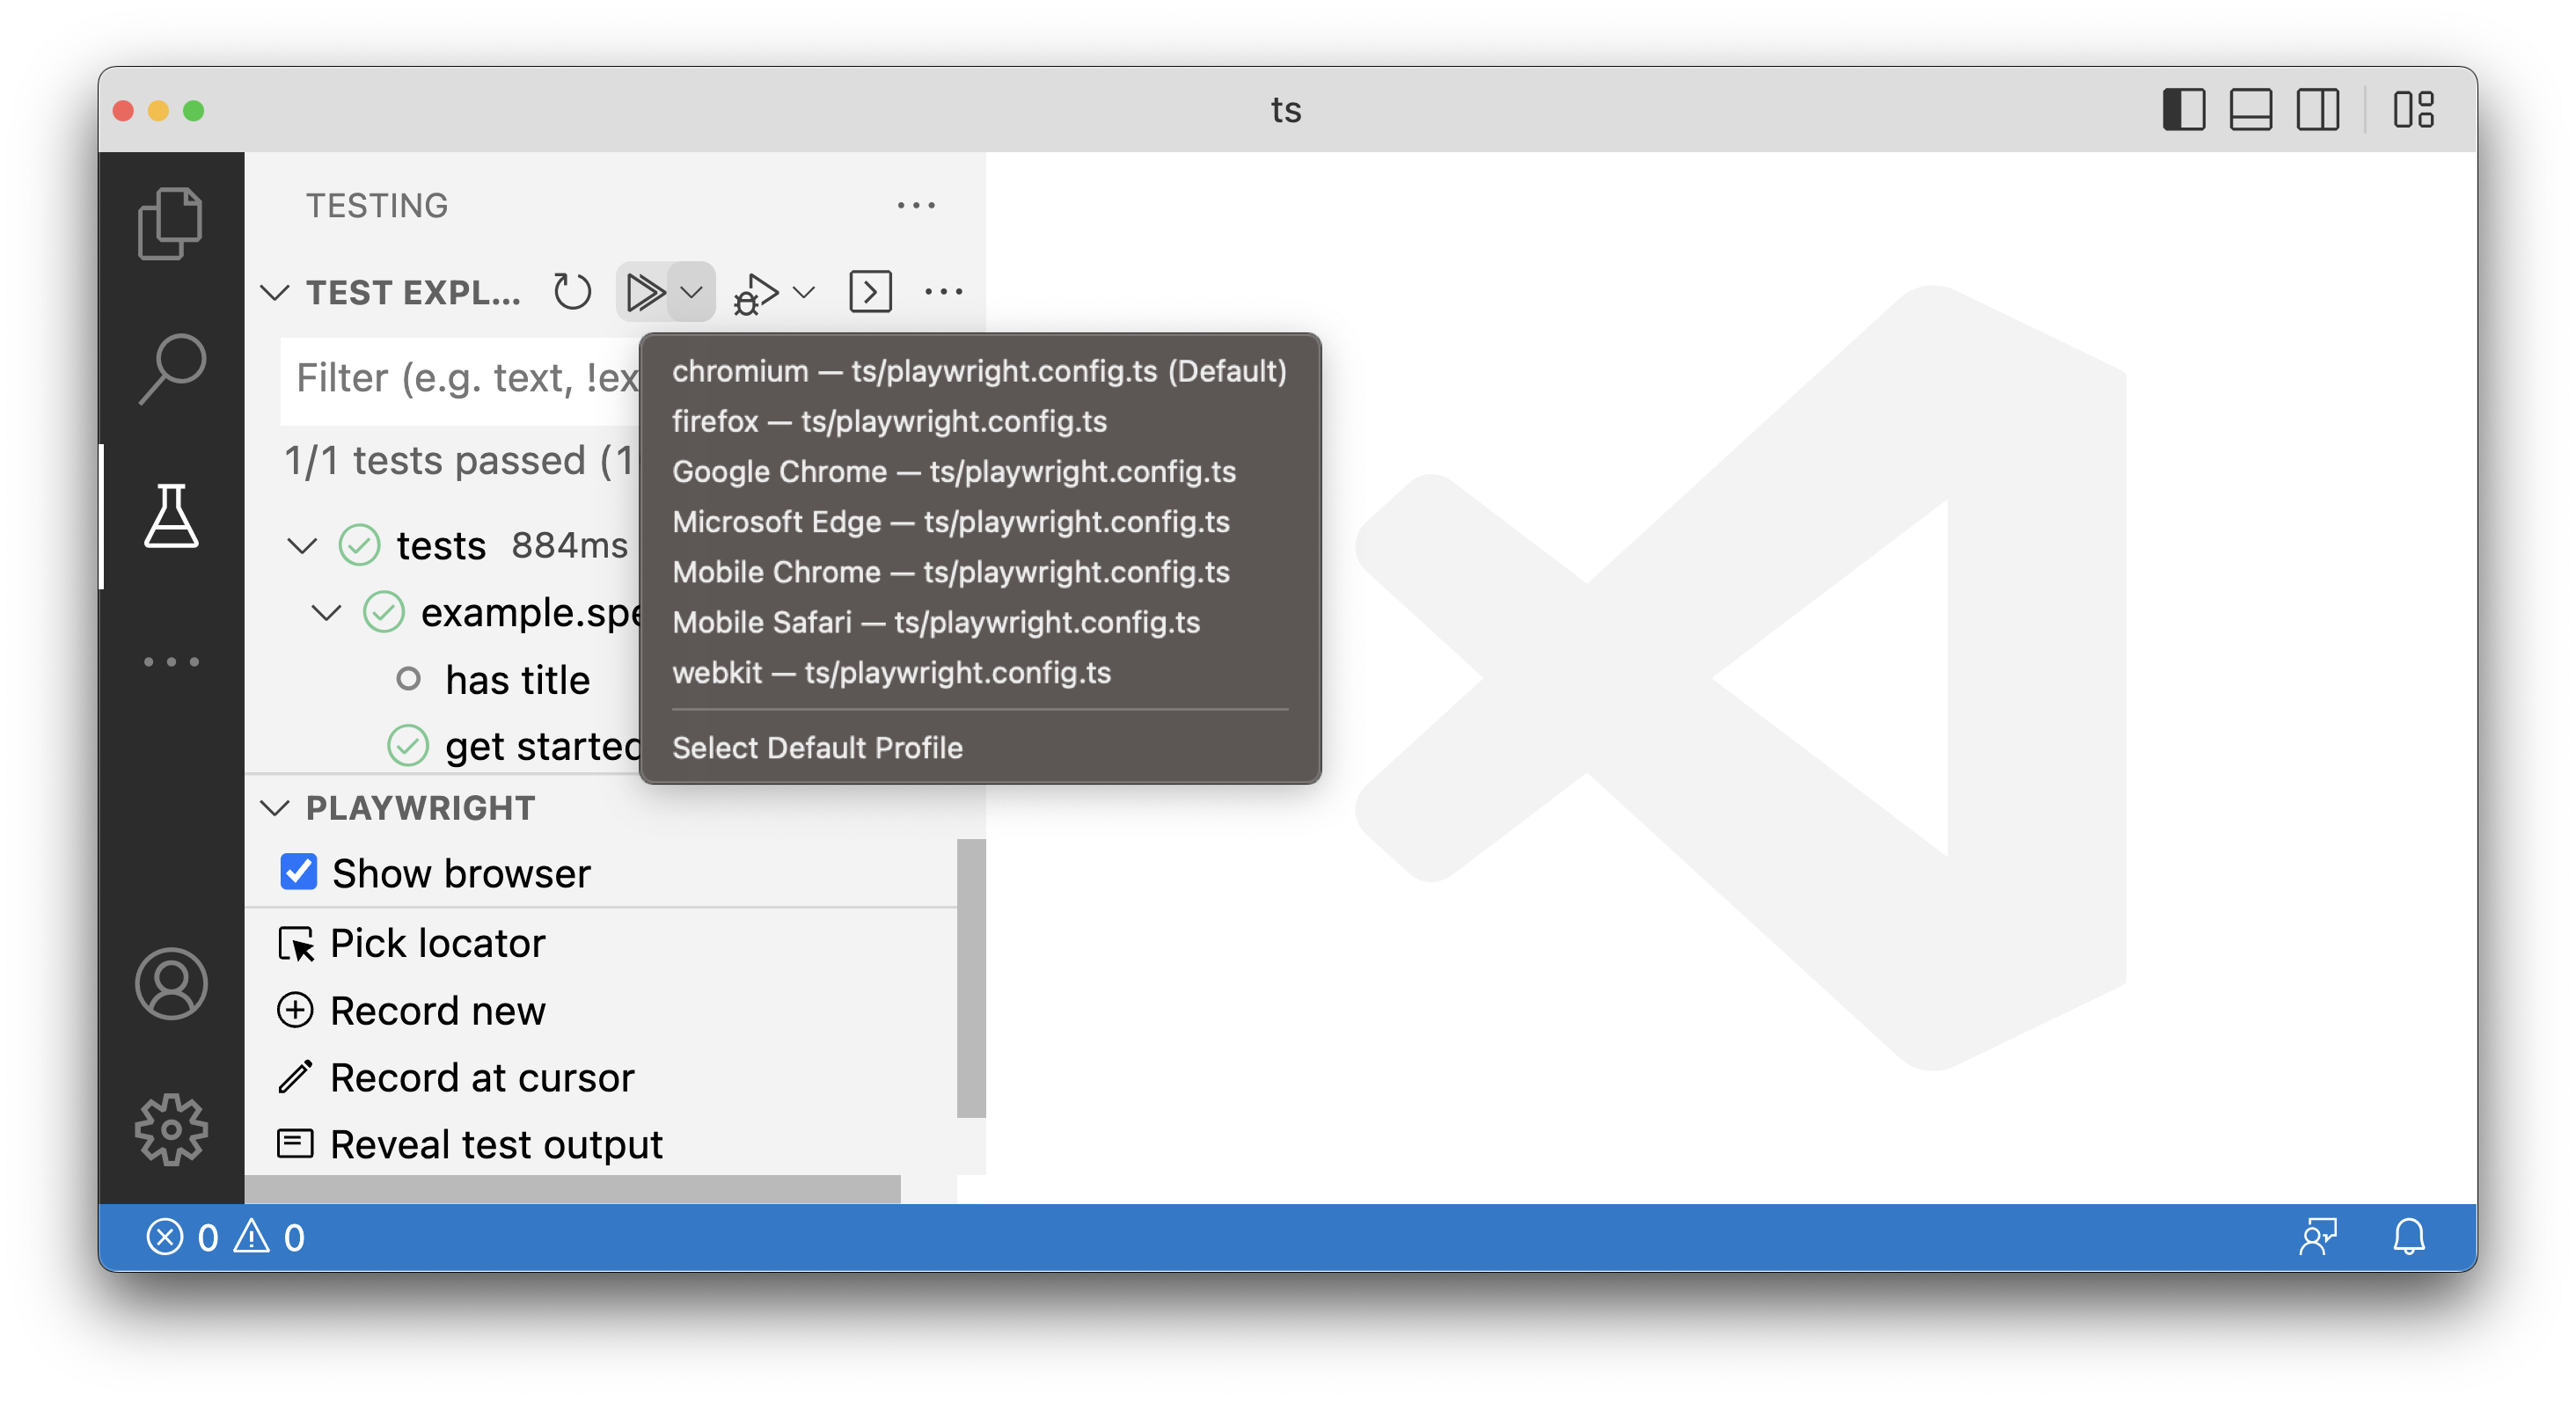
VS Code 测试运行器会在 Chrome 的默认浏览器上运行你的测试。要在其他/多个浏览器上运行测试,请点击测试侧边栏播放按钮的下拉菜单,选择其他配置文件,或点击 选择默认配置文件 修改默认配置文件,并选择你希望运行测试的浏览器。
🌐 The VS Code test runner runs your tests on the default browser of Chrome. To run on other/multiple browsers click the play button's dropdown from the testing sidebar and choose another profile or modify the default profile by clicking Select Default Profile and select the browsers you wish to run your tests on.
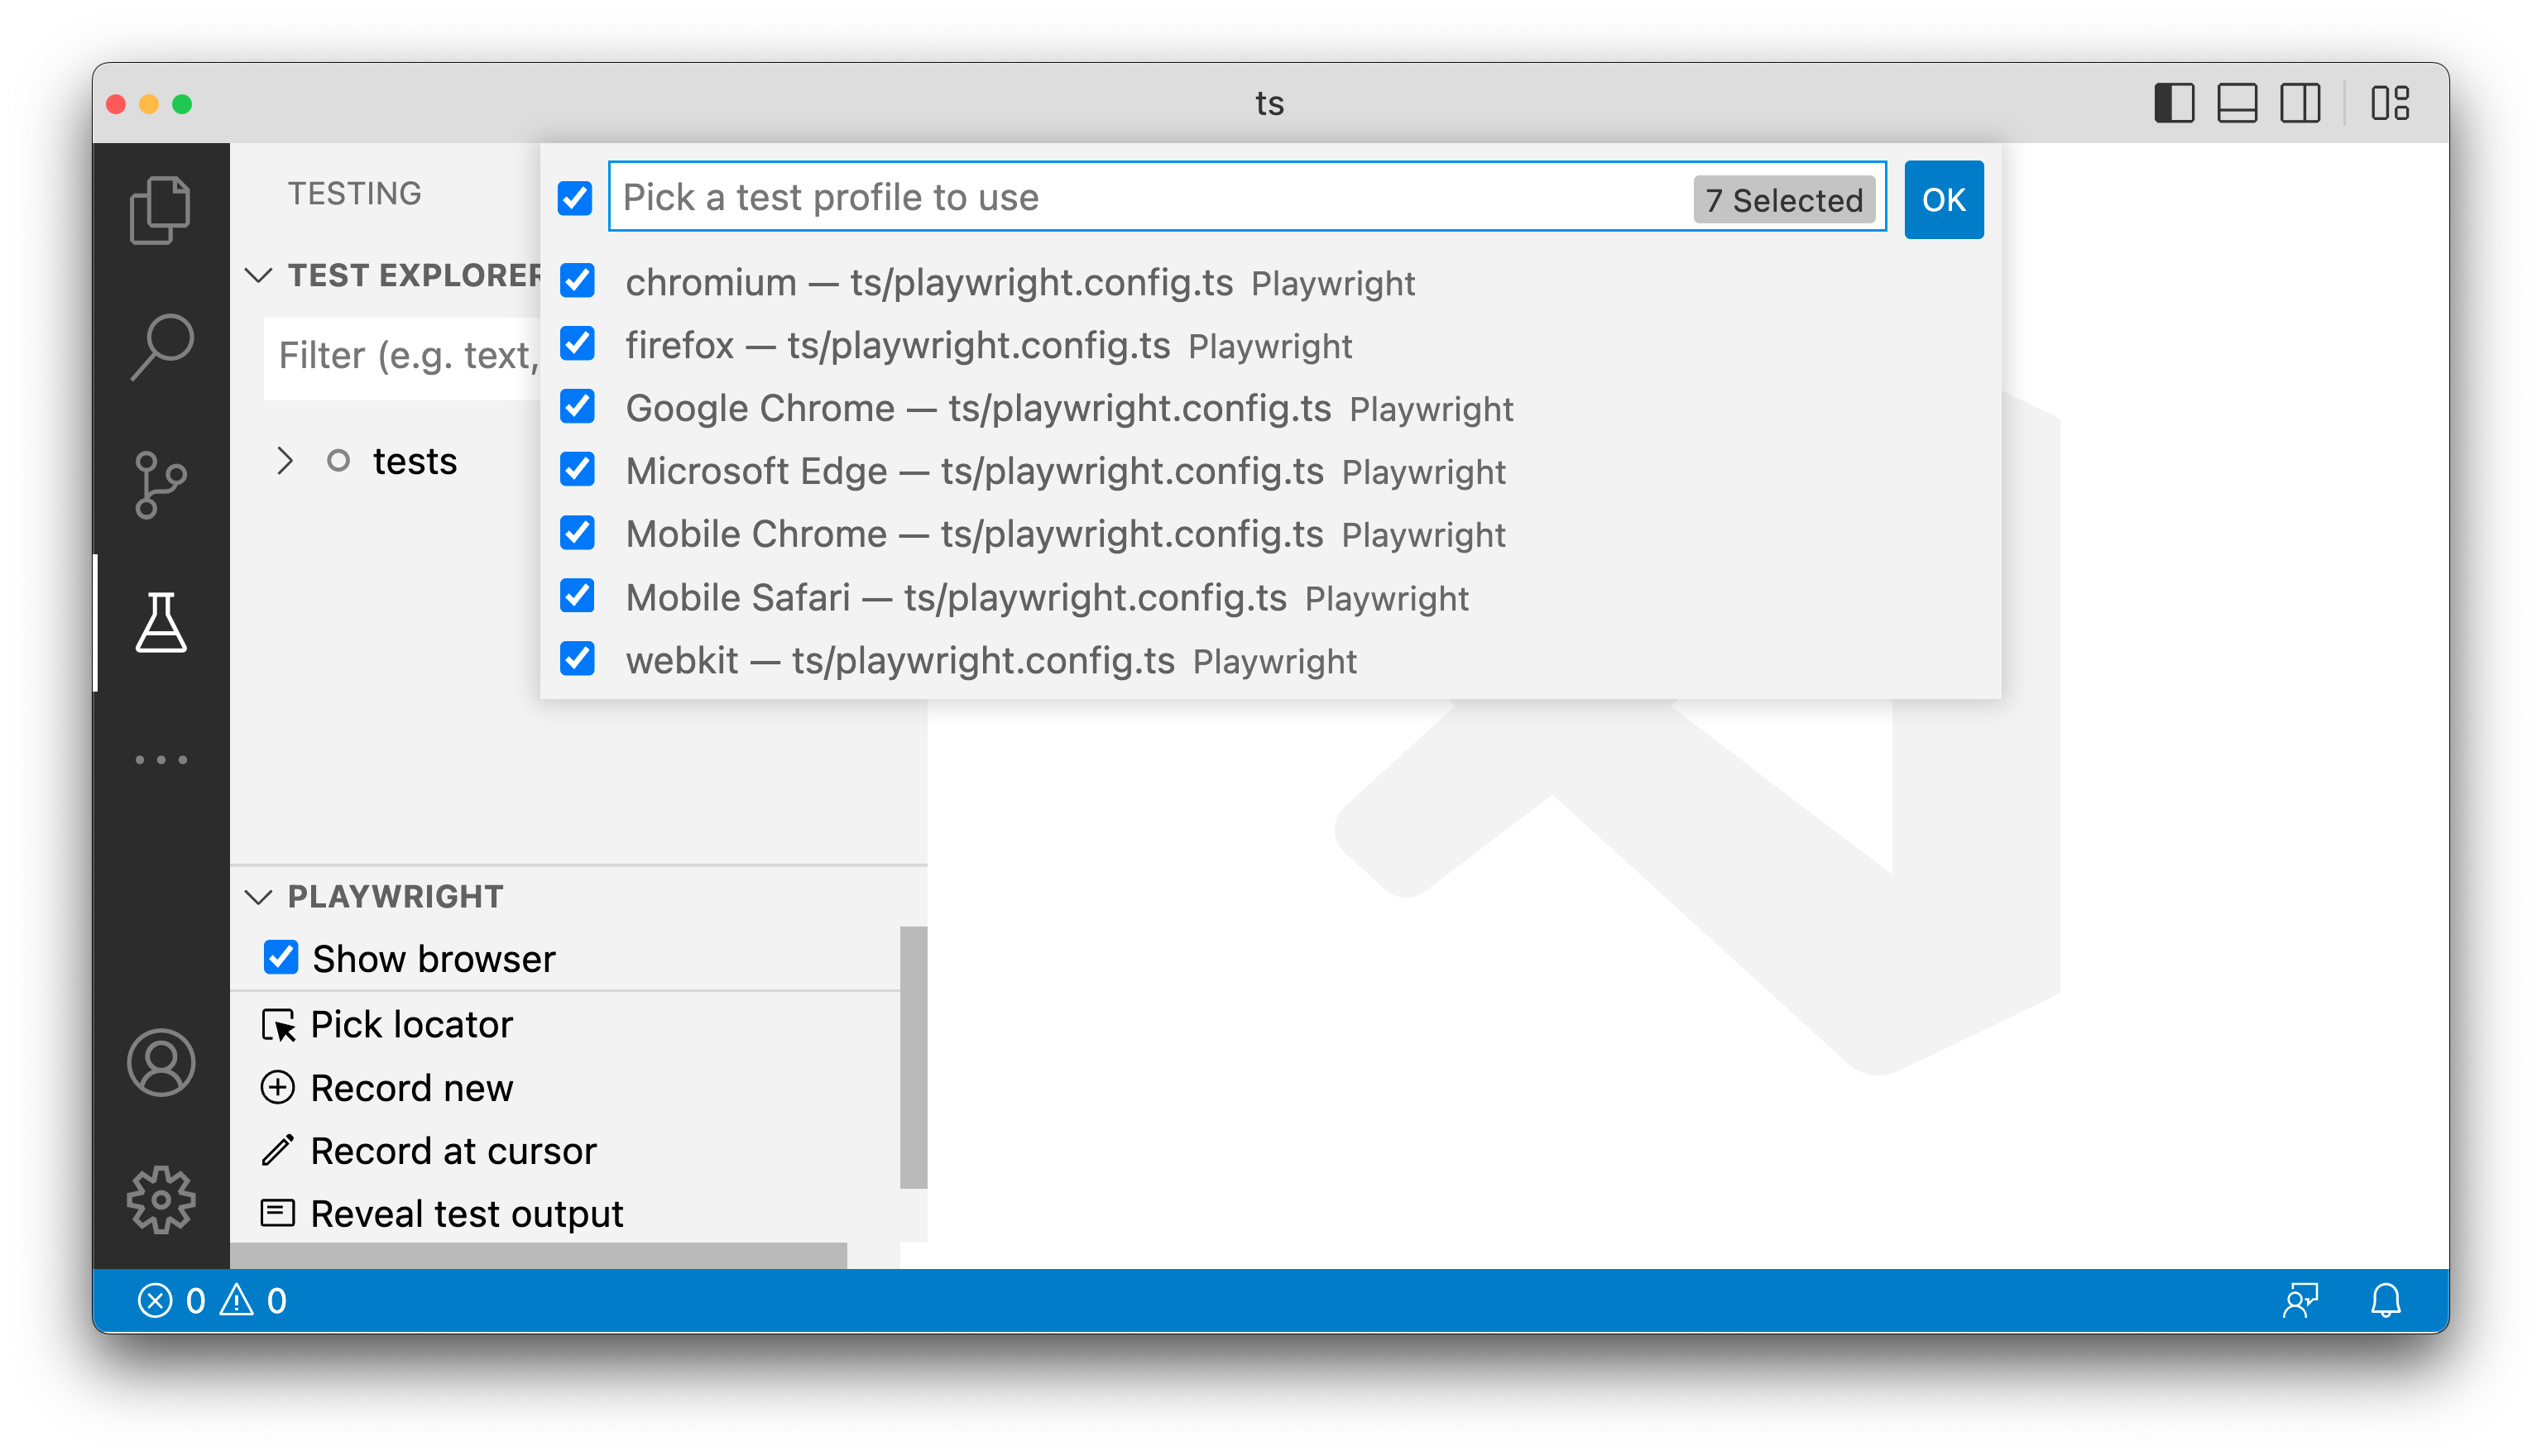
选择要运行测试的特定配置文件、各种配置文件或所有配置文件。
🌐 Choose a specific profile, various profiles or all profiles to run tests on.
为多个环境配置项目
🌐 Configure projects for multiple environments
通过设置项目,我们还可以运行一组具有不同超时或重试次数的测试,或者针对不同环境运行一组测试。例如,我们可以在暂存环境下运行测试并设置两次重试,也可以在生产环境下运行测试并设置零次重试。
🌐 By setting up projects we can also run a group of tests with different timeouts or retries or run a group of tests against different environments. For example we can run our tests against a staging environment with 2 retries as well as against a production environment with 0 retries.
import { defineConfig } from '@playwright/test';

export default defineConfig({
  timeout: 60000, // Timeout is shared between all tests.
  projects: [
    {
      name: 'staging',
      use: {
        baseURL: 'staging.example.com',
      },
      retries: 2,
    },
    {
      name: 'production',
      use: {
        baseURL: 'production.example.com',
      },
      retries: 0,
    },
  ],
});
将测试拆分为项目
🌐 Splitting tests into projects
我们可以将测试拆分为不同的项目,并使用过滤器运行部分测试。例如,我们可以创建一个项目,使用过滤器运行所有具有特定文件名的测试。然后,我们可以有另一组测试,忽略特定的测试文件。
🌐 We can split tests into projects and use filters to run a subset of tests. For example, we can create a project that runs tests using a filter matching all tests with a specific file name. We can then have another group of tests that ignore specific test files.
这是一个定义了常用超时和两个项目的示例。“Smoke”项目运行一个小的测试子集且不进行重试,而“Default”项目运行所有其他测试并进行重试。
🌐 Here is an example that defines a common timeout and two projects. The "Smoke" project runs a small subset of tests without retries, and "Default" project runs all other tests with retries.
import { defineConfig } from '@playwright/test';

export default defineConfig({
  timeout: 60000, // Timeout is shared between all tests.
  projects: [
    {
      name: 'Smoke',
      testMatch: /.*smoke.spec.ts/,
      retries: 0,
    },
    {
      name: 'Default',
      testIgnore: /.*smoke.spec.ts/,
      retries: 2,
    },
  ],
});
依赖
🌐 Dependencies
依赖是需要在另一个项目的测试运行之前先运行的一系列项目。它们对于配置全局设置操作非常有用,因为可以让一个项目依赖于先运行另一个项目的操作。在使用项目依赖时,测试报告器 会显示设置测试,跟踪查看器 会记录设置的跟踪。你可以使用检查器查看设置测试的跟踪的 DOM 快照,也可以在设置中使用 fixtures。
🌐 Dependencies are a list of projects that need to run before the tests in another project run. They can be useful for configuring the global setup actions so that one project depends on this running first. When using project dependencies, test reporters will show the setup tests and the trace viewer will record traces of the setup. You can use the inspector to inspect the DOM snapshot of the trace of your setup tests and you can also use fixtures inside your setup.
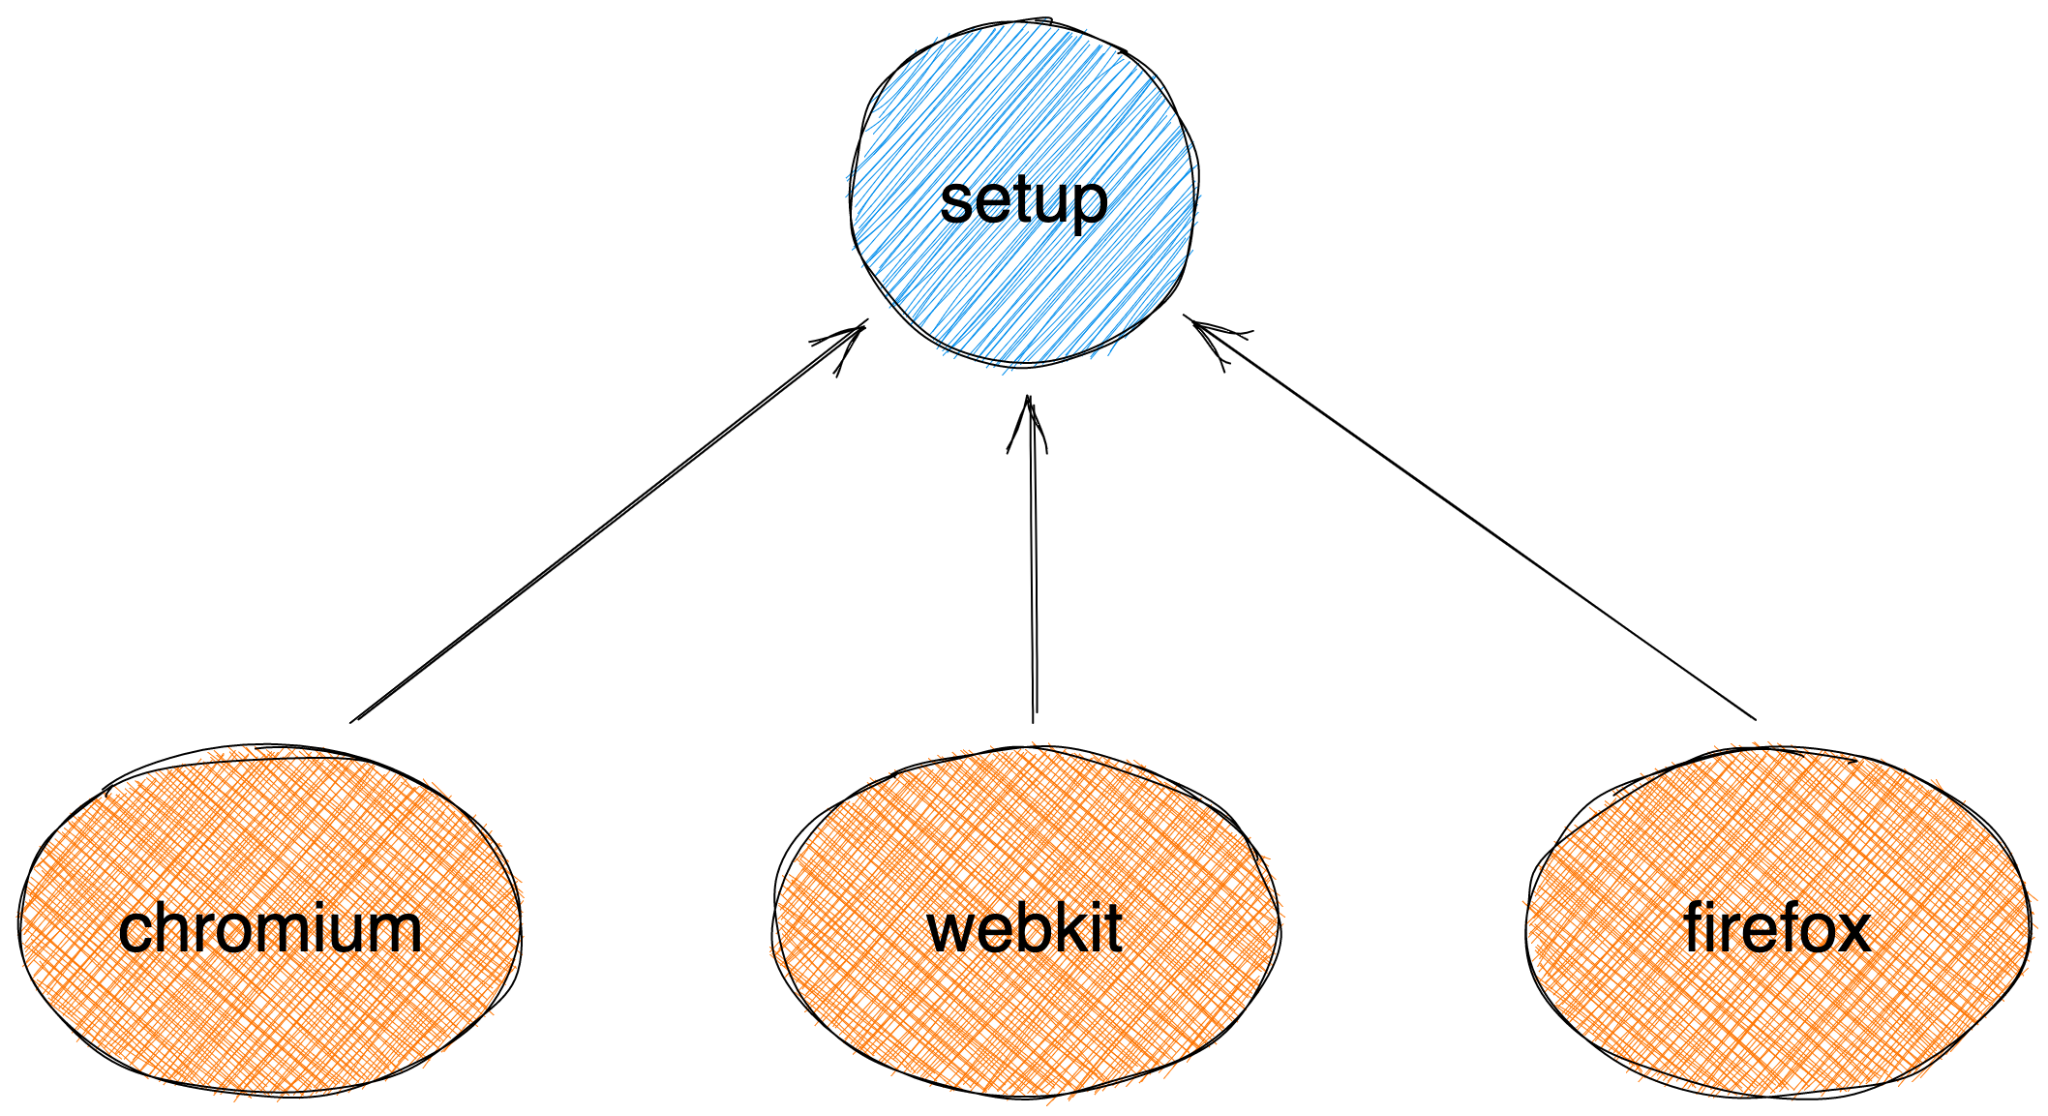
在此示例中,chromium、firefox 和 webkit 项目依赖于安装项目。
🌐 In this example the chromium, firefox and webkit projects depend on the setup project.
import { defineConfig, devices } from '@playwright/test';

export default defineConfig({
  projects: [
    {
      name: 'setup',
      testMatch: '**/*.setup.ts',
    },
    {
      name: 'chromium',
      use: { ...devices['Desktop Chrome'] },
      dependencies: ['setup'],
    },
    {
      name: 'firefox',
      use: { ...devices['Desktop Firefox'] },
      dependencies: ['setup'],
    },
    {
      name: 'webkit',
      use: { ...devices['Desktop Safari'] },
      dependencies: ['setup'],
    },
  ],
});
运行顺序
🌐 Running Sequence
当使用具有依赖的测试时,依赖将始终首先运行,一旦该项目的所有测试都通过,其他项目将并行运行。
🌐 When working with tests that have a dependency, the dependency will always run first and once all tests from this project have passed, then the other projects will run in parallel.
运行指令:
🌐 Running order:
- 'setup' 项目中的测试正在运行。一旦该项目中的所有测试通过,依赖目的测试将开始运行。
- 'chromium'、'webkit' 和 'firefox' 项目的测试会一起运行。默认情况下,这些项目将并行运行,受最大工作进程数的限制。
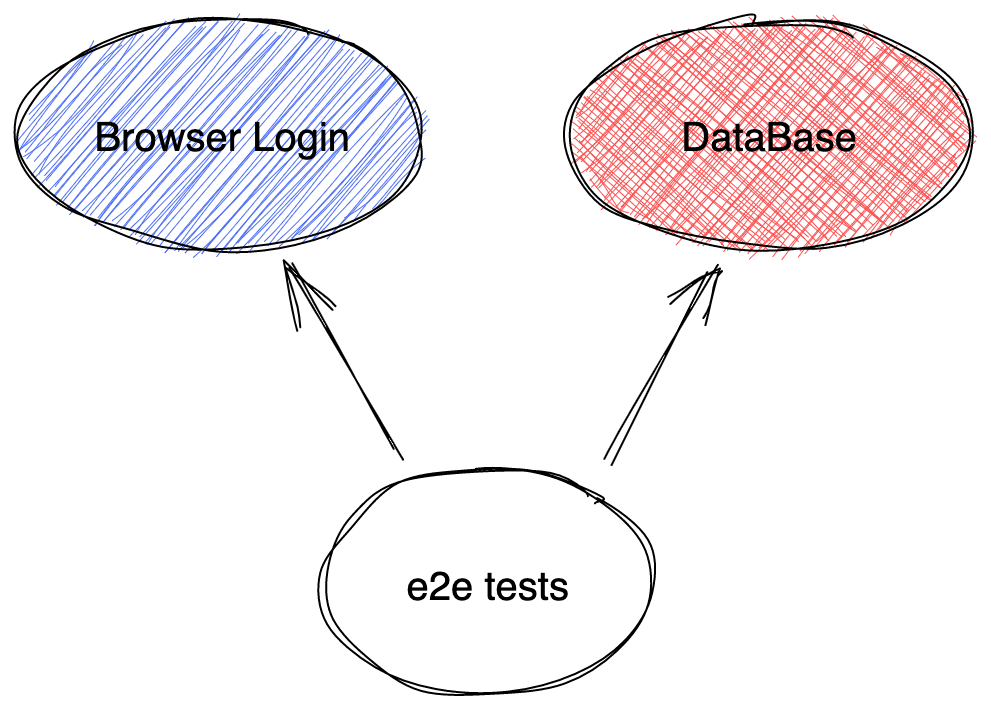
如果有多个依赖,这些项目依赖将首先运行,并且是并行运行的。如果依赖的测试失败,那么依赖于该项目的测试将不会运行。
🌐 If there are more than one dependency then these project dependencies will be run first and in parallel. If the tests from a dependency fails then the tests that rely on this project will not be run.
运行指令:
🌐 Running order:
- 'Browser Login' 和 'DataBase' 项目中的测试并行运行:
- “浏览器登录”通过
- ❌ “数据库”失败!
- 'e2e 测试' 项目未运行!
拆除
🌐 Teardown
你也可以通过在你的设置项目中添加 testProject.teardown 属性来拆除你的设置。Teardown 会在所有依赖目运行之后执行。有关更多信息,请参阅 teardown 指南。
🌐 You can also teardown your setup by adding a testProject.teardown property to your setup project. Teardown will run after all dependent projects have run. See the teardown guide for more information.
测试过滤
🌐 Test filtering
所有测试过滤选项,例如 --grep/--grep-invert、--shard、直接在命令行按位置过滤,或使用 test.only(),都会直接选择要运行的主要测试。如果这些测试属于有依赖的项目,那么这些依赖目中的所有测试也会运行。
🌐 All test filtering options, such as --grep/--grep-invert, --shard, filtering directly by location in the command line, or using test.only(), directly select the primary tests to be run. If those tests belong to a project with dependencies, all tests from those dependencies will also run.
你可以传递 --no-deps 命令行选项来忽略所有依赖和清理操作。只有你直接选择的项目会运行。
🌐 You can pass --no-deps command line option to ignore all dependencies and teardowns. Only your directly selected projects will run.
自定义项目参数
🌐 Custom project parameters
项目也可以用于使用你的自定义配置参数化测试——请查看 这份独立指南。
🌐 Projects can be also used to parametrize tests with your custom configuration - take a look at this separate guide.