最佳实践
介绍
🌐 Introduction
本指南应帮助你确保遵循我们的最佳实践并编写更具弹性的测试。
🌐 This guide should help you to make sure you are following our best practices and writing tests that are more resilient.
测试理念
🌐 Testing philosophy
测试用户可见的行为
🌐 Test user-visible behavior
自动化测试应该验证应用代码是否对终端用户有效,并避免依赖实现细节,例如用户通常不会使用、看到或甚至不知道的内容,如函数名称、某个对象是否是数组,或某个元素的 CSS 类名。终端用户会看到或与页面上渲染的内容进行交互,因此你的测试通常应只查看或与相同的渲染输出进行交互。
🌐 Automated tests should verify that the application code works for the end users, and avoid relying on implementation details such as things which users will not typically use, see, or even know about such as the name of a function, whether something is an array, or the CSS class of some element. The end user will see or interact with what is rendered on the page, so your test should typically only see/interact with the same rendered output.
使测试尽可能隔离
🌐 Make tests as isolated as possible
每个测试应与其他测试完全隔离,并应独立运行,拥有自己的本地存储、会话存储、数据、Cookies 等。测试隔离 提高了可重复性,使调试更容易,并防止级联测试失败。
🌐 Each test should be completely isolated from another test and should run independently with its own local storage, session storage, data, cookies etc. Test isolation improves reproducibility, makes debugging easier and prevents cascading test failures.
为了避免在测试的特定部分重复操作,你可以使用前置和后置钩子。在你的测试文件中添加一个前置钩子,以便在每个测试之前运行测试的一部分,例如访问特定的 URL 或登录应用的某部分。这可以保持你的测试独立性,因为没有测试依赖于其他测试。然而,当测试足够简单时,适当的重复也是可以的,特别是如果这样可以让你的测试更清晰、更易于阅读和维护。
🌐 In order to avoid repetition for a particular part of your test you can use before and after hooks. Within your test file add a before hook to run a part of your test before each test such as going to a particular URL or logging in to a part of your app. This keeps your tests isolated as no test relies on another. However it is also ok to have a little duplication when tests are simple enough especially if it keeps your tests clearer and easier to read and maintain.
import { test } from '@playwright/test';

test.beforeEach(async ({ page }) => {
  // Runs before each test and signs in each page.
  await page.goto('https://github.com/login');
  await page.getByLabel('Username or email address').fill('username');
  await page.getByLabel('Password').fill('password');
  await page.getByRole('button', { name: 'Sign in' }).click();
});

test('first', async ({ page }) => {
  // page is signed in.
});

test('second', async ({ page }) => {
  // page is signed in.
});
你还可以在测试中使用设置项目来重用已登录状态。这样你只需登录一次,然后就可以在所有测试中跳过登录步骤。
🌐 You can also reuse the signed-in state in the tests with setup project. That way you can log in only once and then skip the log in step for all of the tests.
避免测试第三方依赖
🌐 Avoid testing third-party dependencies
只测试你可以控制的内容。不要尝试测试你无法控制的外部网站或第三方服务器的链接。这不仅耗时并可能拖慢你的测试速度,而且你无法控制所链接页面的内容,或者页面上是否有 cookie 横幅、覆盖页面或任何可能导致测试失败的因素。
🌐 Only test what you control. Don't try to test links to external sites or third party servers that you do not control. Not only is it time consuming and can slow down your tests but also you cannot control the content of the page you are linking to, or if there are cookie banners or overlay pages or anything else that might cause your test to fail.
相反,请使用 Playwright 网络 API 并保证所需的响应。
🌐 Instead, use the Playwright Network API and guarantee the response needed.
await page.route('**/api/fetch_data_third_party_dependency', route => route.fulfill({
  status: 200,
  body: testData,
}));
await page.goto('https://example.com');
使用数据库进行测试
🌐 Testing with a database
如果处理数据库,请确保你能控制数据。在测试环境中进行测试,并确保数据不会发生变化。对于视觉回归测试,请确保操作系统和浏览器版本相同。
🌐 If working with a database then make sure you control the data. Test against a staging environment and make sure it doesn't change. For visual regression tests make sure the operating system and browser versions are the same.
最佳实践
🌐 Best Practices
使用定位器
🌐 Use locators
为了编写端到端测试,我们首先需要在网页上查找元素。我们可以使用 Playwright 内置的 定位器 来完成这项工作。定位器具有自动等待和可重试的特性。自动等待意味着 Playwright 会对元素执行一系列可操作性检查,例如在执行点击操作之前确保元素可见且可用。为了使测试更加稳健,我们建议优先使用面向用户的属性和明确的契约。
🌐 In order to write end to end tests we need to first find elements on the webpage. We can do this by using Playwright's built in locators. Locators come with auto waiting and retry-ability. Auto waiting means that Playwright performs a range of actionability checks on the elements, such as ensuring the element is visible and enabled before it performs the click. To make tests resilient, we recommend prioritizing user-facing attributes and explicit contracts.
// 👍
page.getByRole('button', { name: 'submit' });
使用链接和过滤
🌐 Use chaining and filtering
定位器可以链式使用,以将搜索范围缩小到页面的特定部分。
🌐 Locators can be chained to narrow down the search to a particular part of the page.
const product = page.getByRole('listitem').filter({ hasText: 'Product 2' });
你也可以通过文本或其他定位器来筛选定位器。
🌐 You can also filter locators by text or by another locator.
await page
    .getByRole('listitem')
    .filter({ hasText: 'Product 2' })
    .getByRole('button', { name: 'Add to cart' })
    .click();
优先选择面向用户的属性而不是 XPath 或 CSS 选择器
🌐 Prefer user-facing attributes to XPath or CSS selectors
你的 DOM 可能会轻易发生变化,因此让测试依赖于 DOM 结构可能会导致测试失败。例如,考虑通过 CSS 类选择这个按钮。如果设计师修改了一些内容,那么类可能会改变,从而破坏你的测试。
🌐 Your DOM can easily change so having your tests depend on your DOM structure can lead to failing tests. For example consider selecting this button by its CSS classes. Should the designer change something then the class might change, thus breaking your test.
// 👎
page.locator('button.buttonIcon.episode-actions-later');
使用能够适应 DOM 变化的定位器。
🌐 Use locators that are resilient to changes in the DOM.
// 👍
page.getByRole('button', { name: 'submit' });
生成定位器
🌐 Generate locators
Playwright 有一个 测试生成器,可以为你生成测试并选择定位器。它会查看你的页面并找出最佳定位器,优先使用角色、文本和测试 ID 定位器。如果生成器发现有多个元素匹配该定位器,它将优化定位器,使其更稳健并唯一标识目标元素,这样你就不必担心测试因为定位器问题而失败。
🌐 Playwright has a test generator that can generate tests and pick locators for you. It will look at your page and figure out the best locator, prioritizing role, text and test id locators. If the generator finds multiple elements matching the locator, it will improve the locator to make it resilient and uniquely identify the target element, so you don't have to worry about failing tests due to locators.
使用 codegen 生成定位器
🌐 Use codegen to generate locators
要选择定位器,请运行 codegen 命令,然后输入你想要从中选择定位器的 URL。
🌐 To pick a locator run the codegen command followed by the URL that you would like to pick a locator from.
- npm
- yarn
- pnpm
npx playwright codegen playwright.dev
yarn playwright codegen playwright.dev
pnpm exec playwright codegen playwright.dev
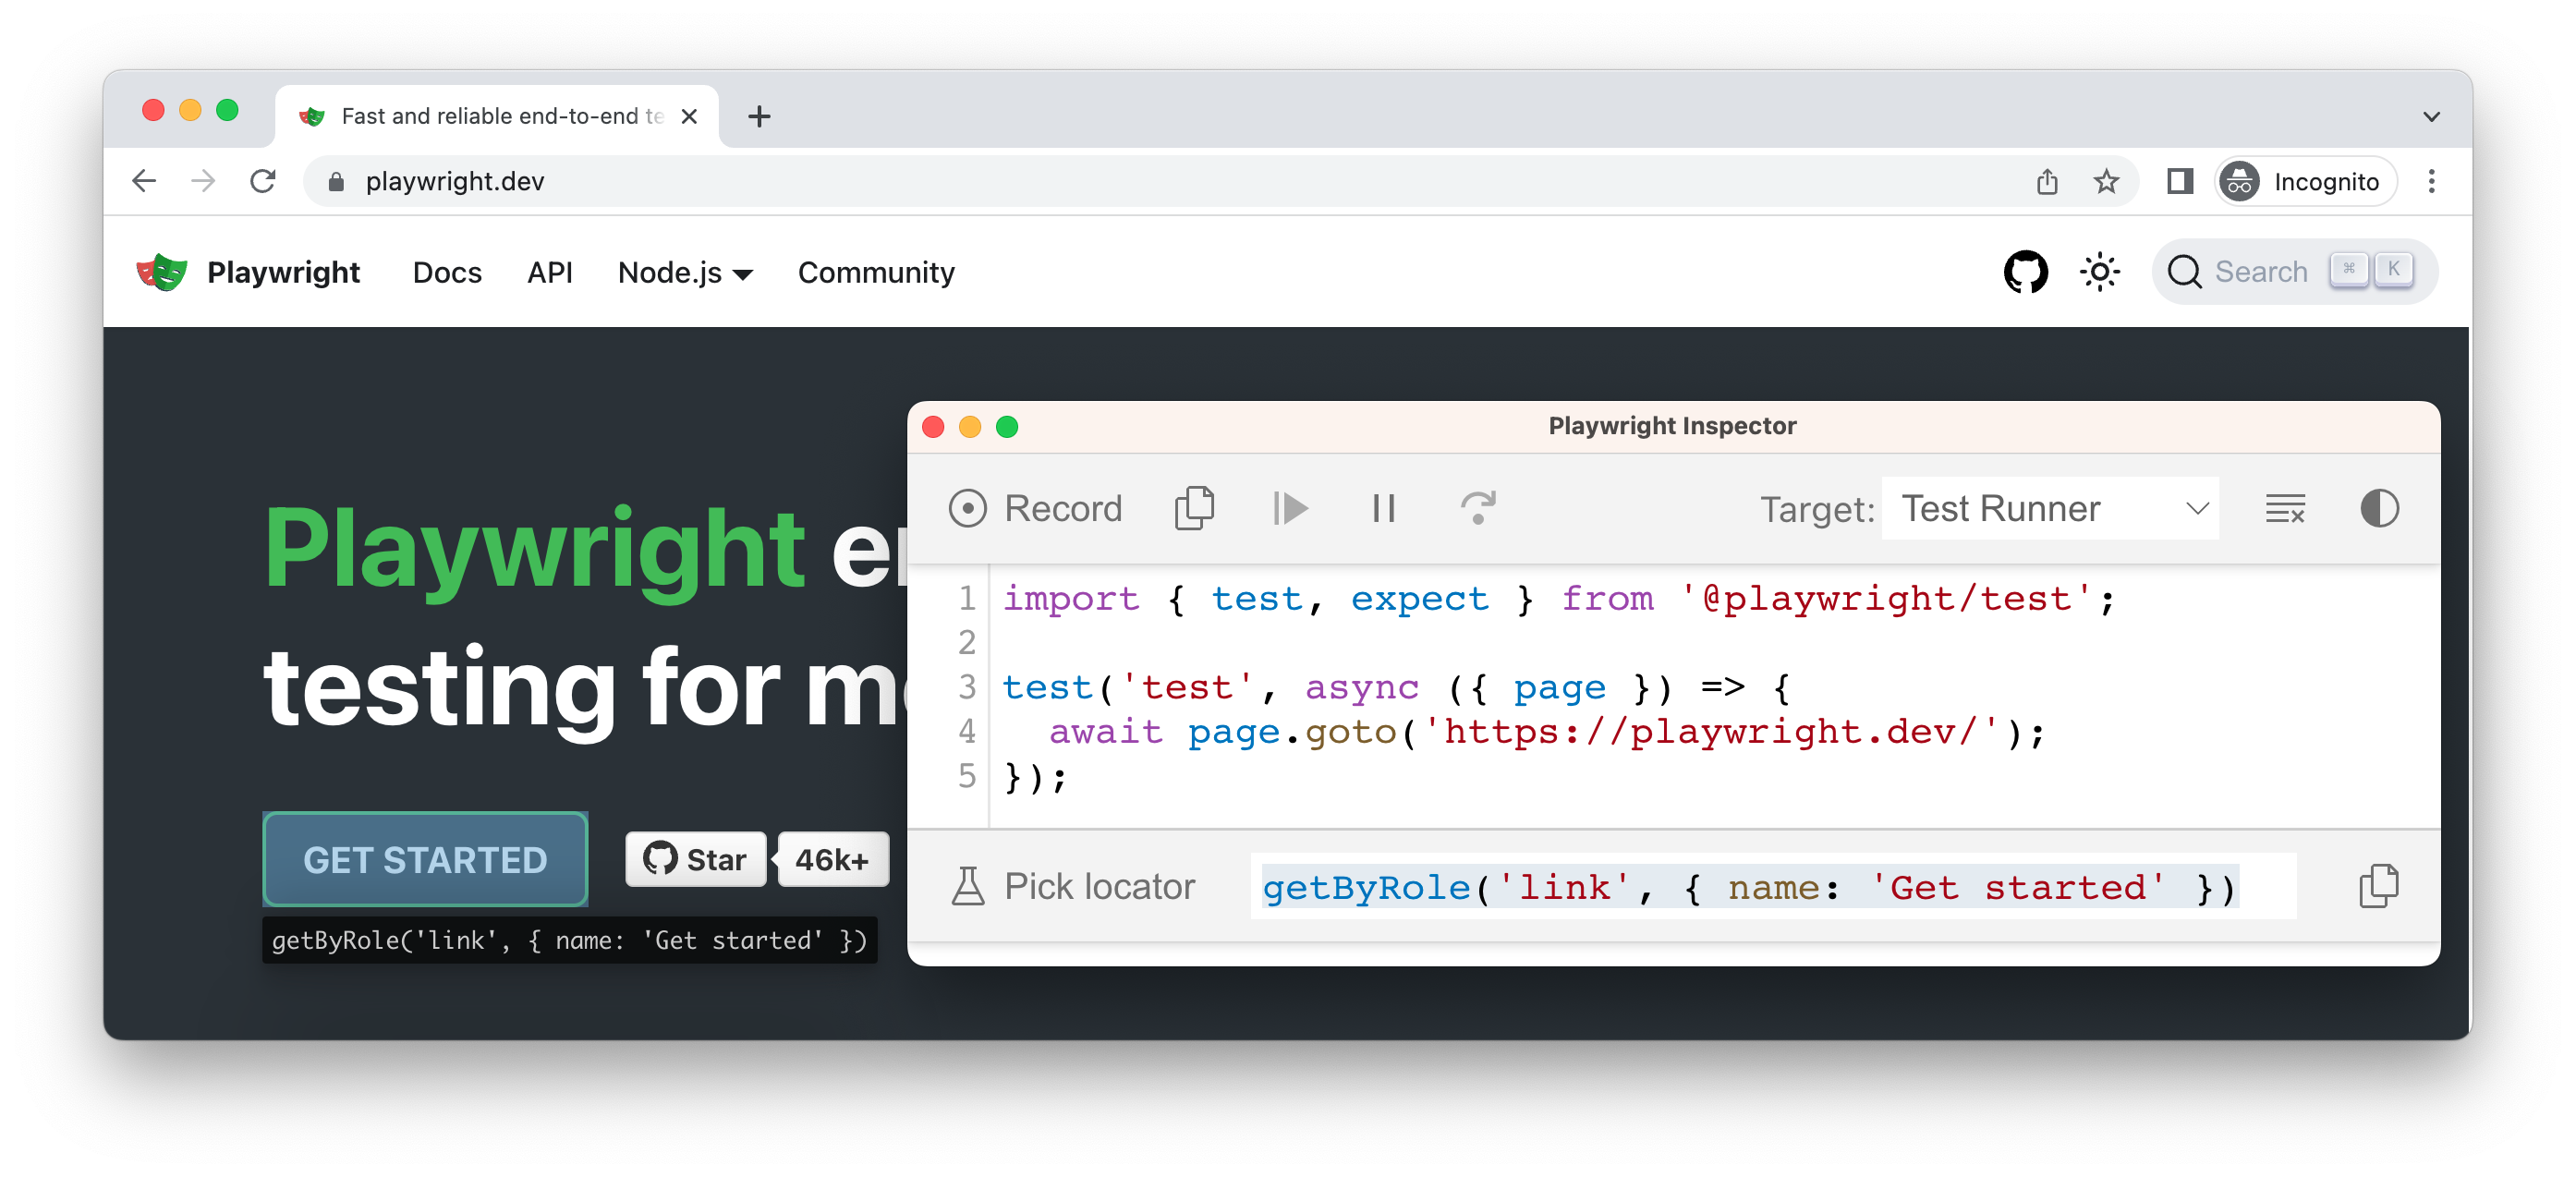
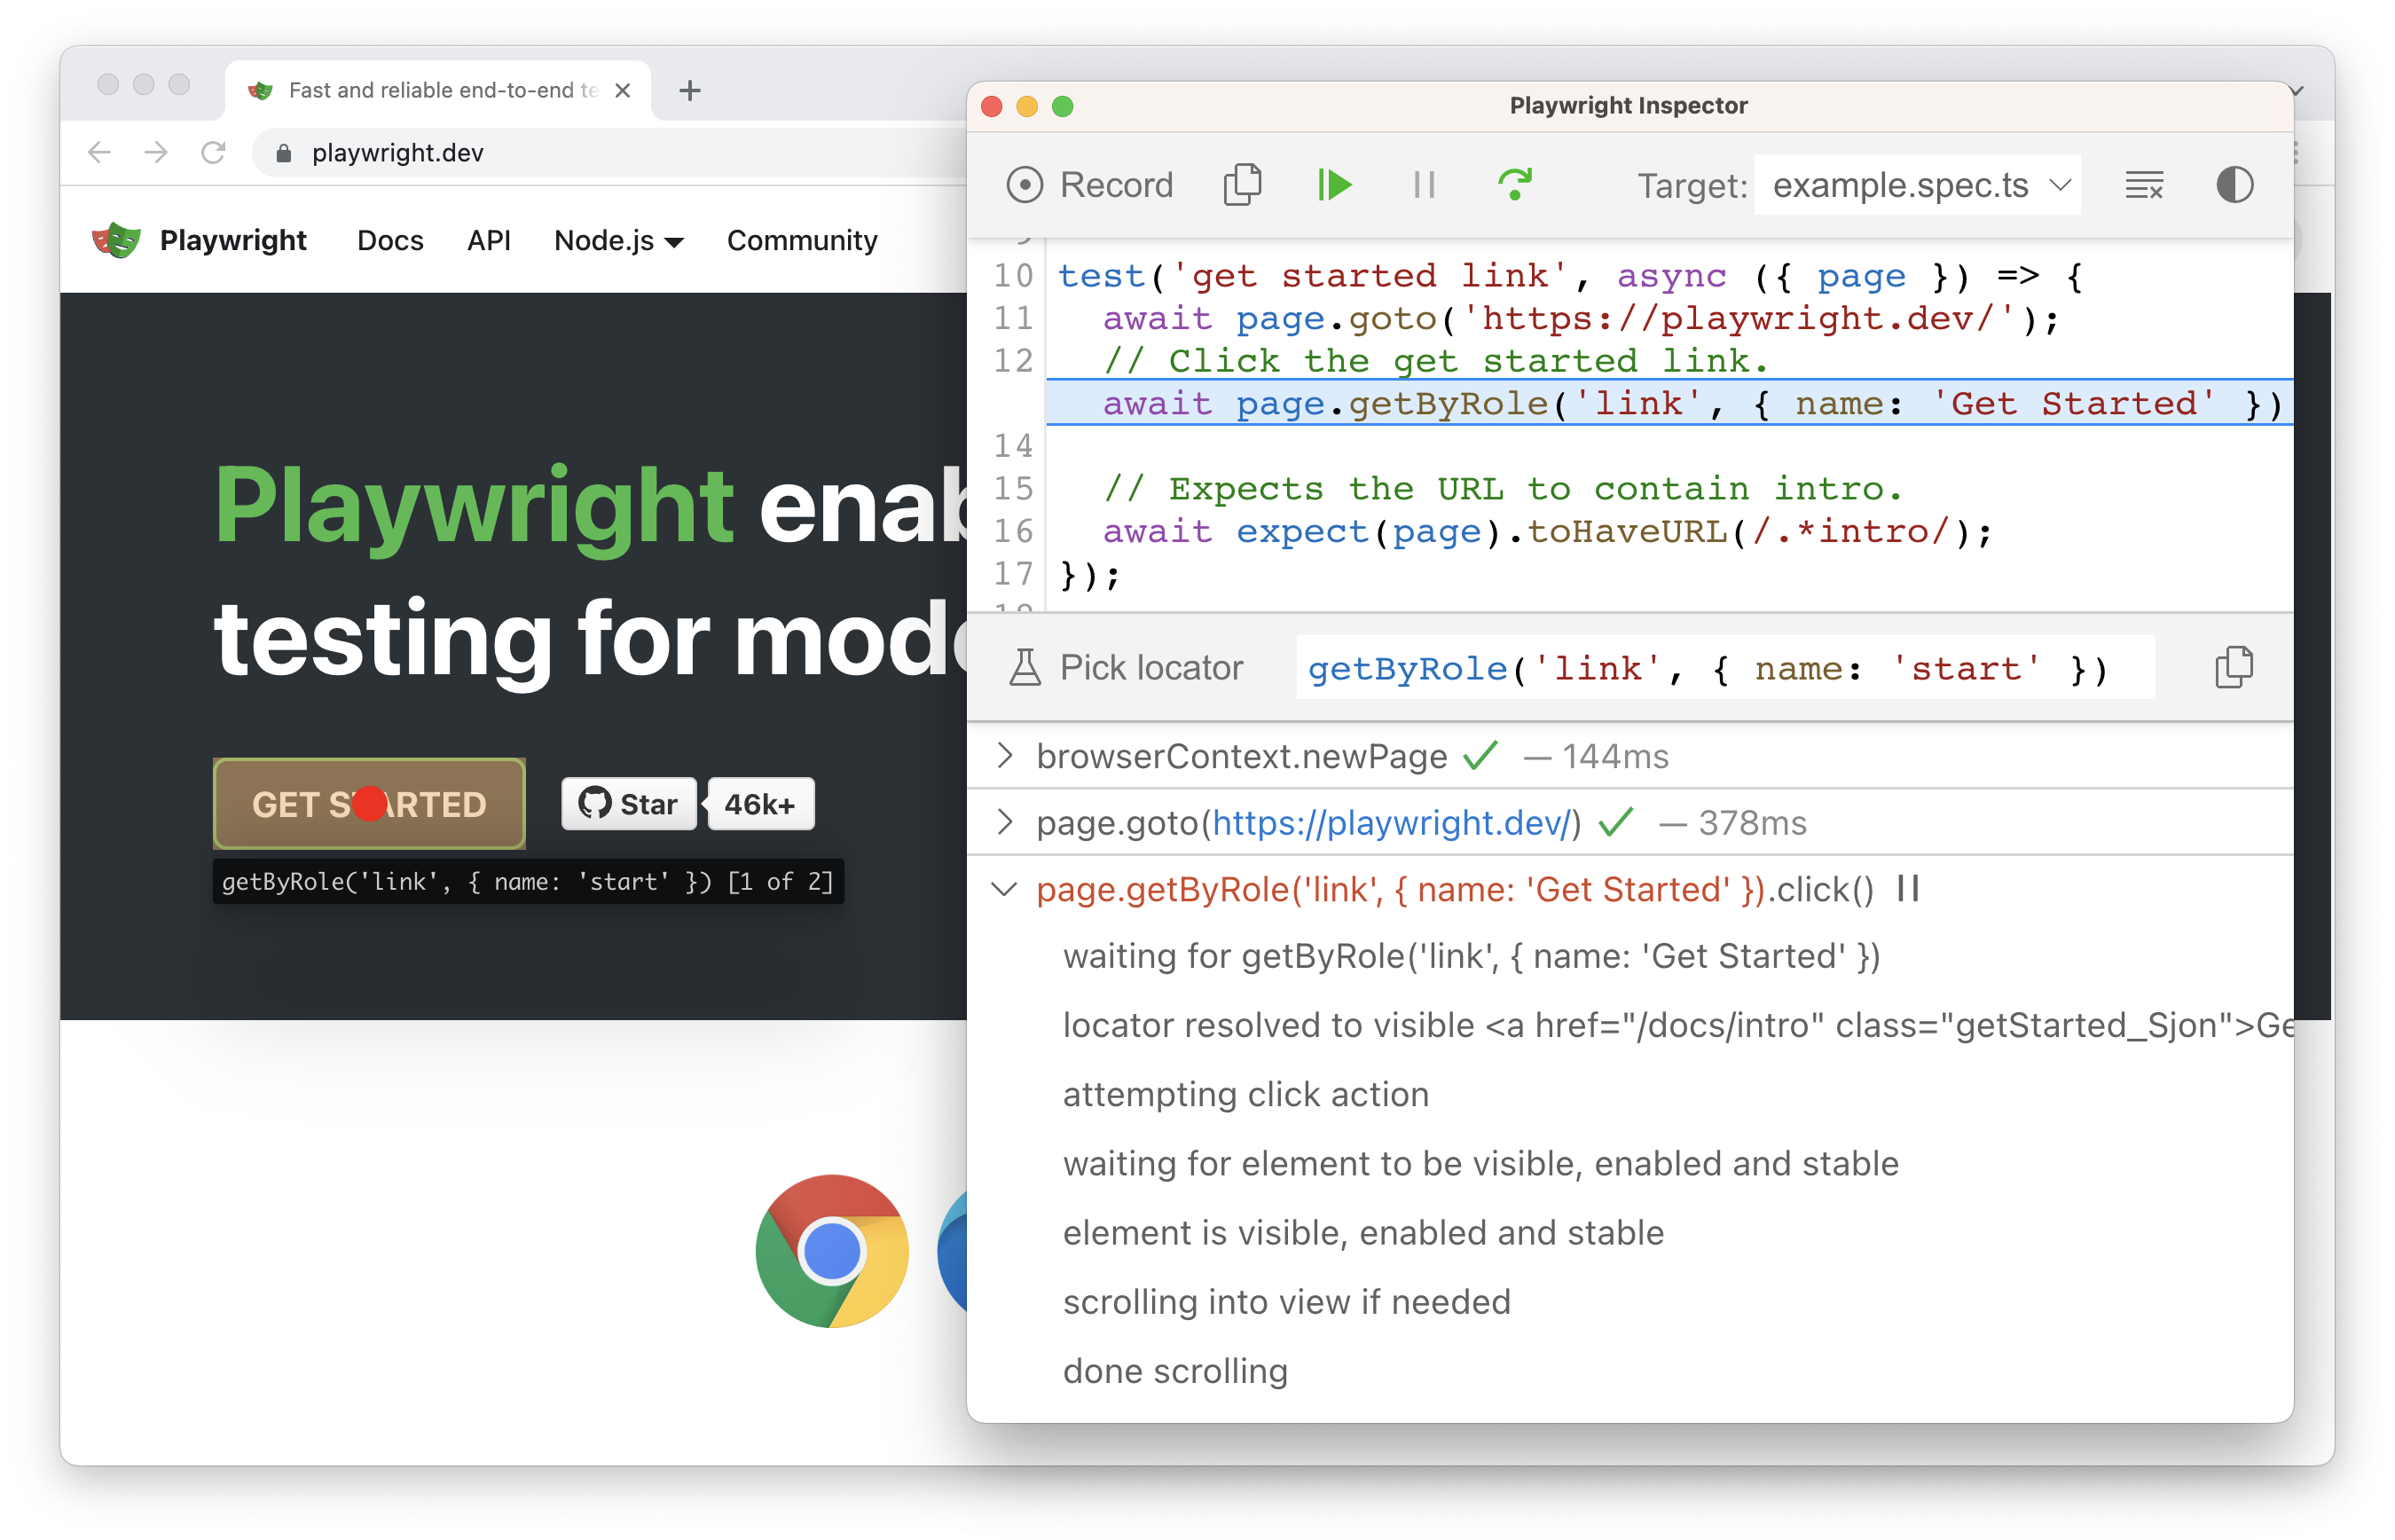
这将打开一个新的浏览器窗口以及 Playwright 检查器。要选择定位器,首先点击“录制”按钮以停止录制。默认情况下,当你运行 codegen 命令时,它会开始新的录制。一旦停止录制,“选择定位器”按钮将可以点击。
🌐 This will open a new browser window as well as the Playwright inspector. To pick a locator first click on the 'Record' button to stop the recording. By default when you run the codegen command it will start a new recording. Once you stop the recording the 'Pick Locator' button will be available to click.
然后,你可以在浏览器窗口中将鼠标悬停在页面上的任何元素上,并在光标下方看到定位器高亮显示。点击某个元素将把定位器添加到 Playwright 检查器中。你可以复制该定位器并粘贴到测试文件中,或者通过在 Playwright 检查器中编辑它来继续探索定位器,例如修改文本,并在浏览器窗口中查看结果。
🌐 You can then hover over any element on your page in the browser window and see the locator highlighted below your cursor. Clicking on an element will add the locator into the Playwright inspector. You can either copy the locator and paste into your test file or continue to explore the locator by editing it in the Playwright Inspector, for example by modifying the text, and seeing the results in the browser window.
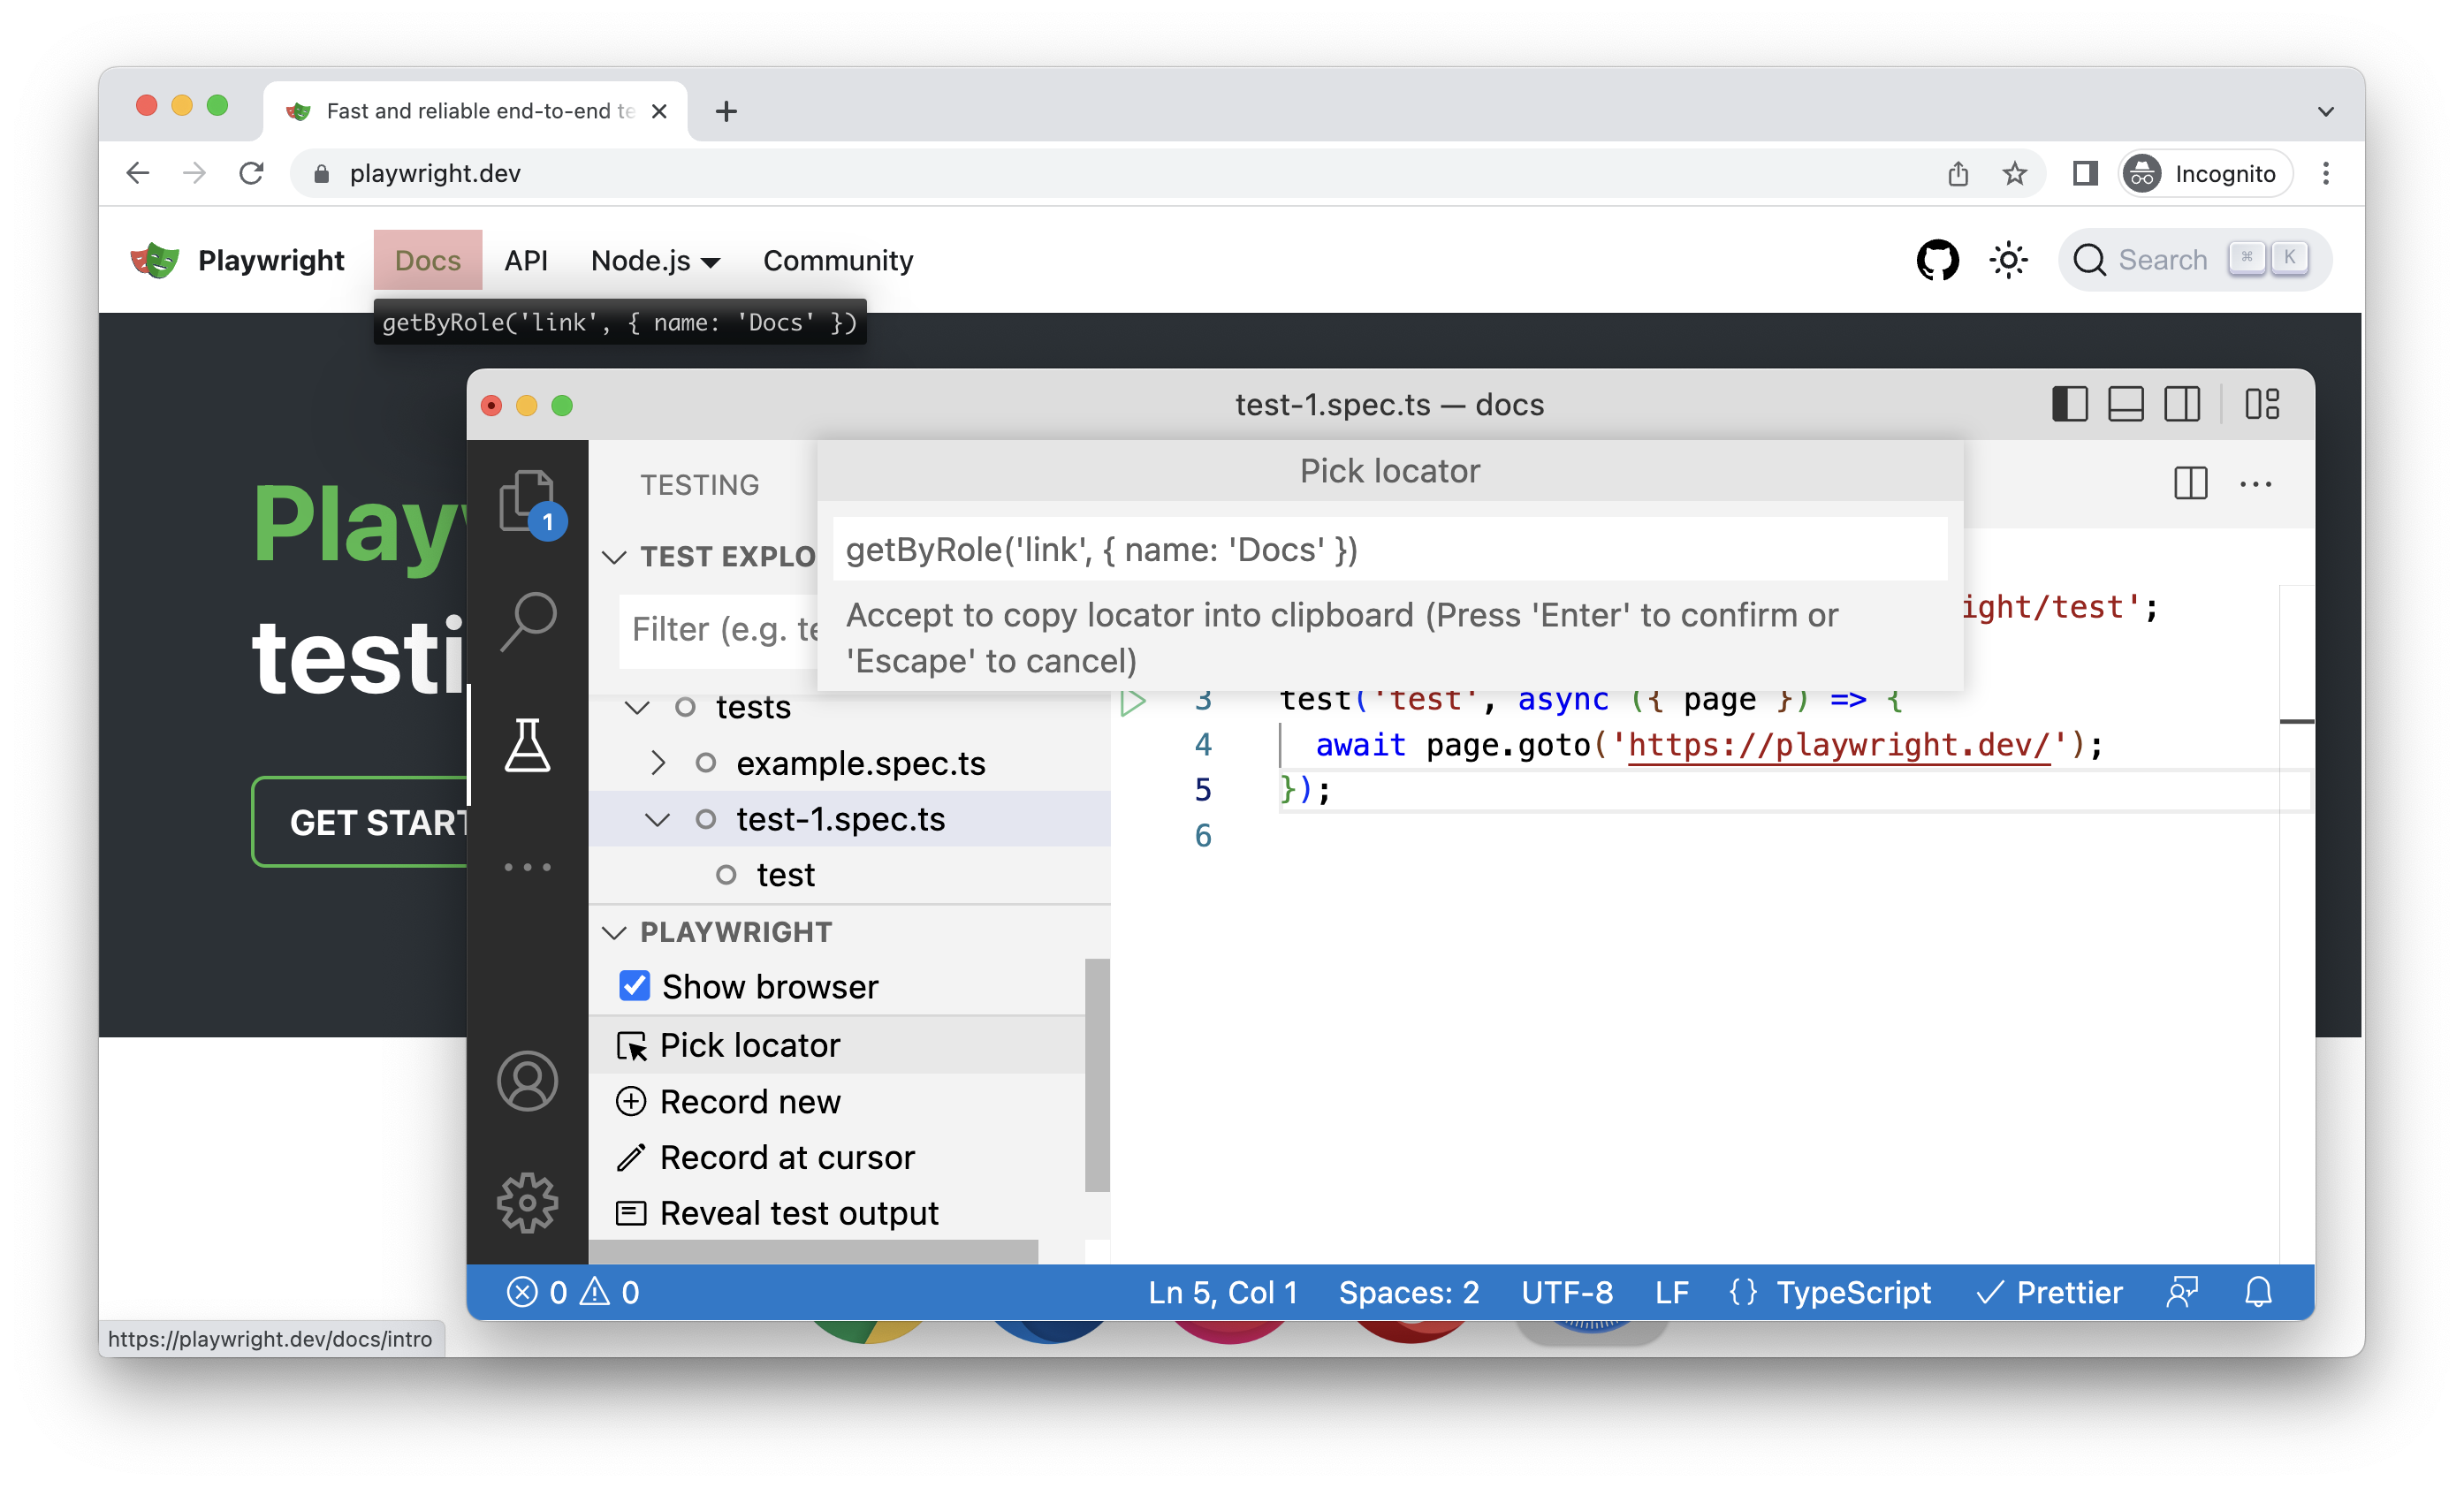
使用 VS Code 扩展生成定位器
🌐 Use the VS Code extension to generate locators
你也可以使用 VS Code 扩展 来生成定位器以及录制测试。VS Code 扩展在编写、运行和调试测试时也能为你提供出色的开发者体验。
🌐 You can also use the VS Code Extension to generate locators as well as record a test. The VS Code extension also gives you a great developer experience when writing, running, and debugging tests.
使用网络优先断言
🌐 Use web first assertions
断言是一种验证预期结果与实际结果是否匹配的方法。通过使用 web first assertions,Playwright 将会等待直到满足预期条件。例如,在测试提示消息时,测试会点击一个按钮,使消息出现,并检查提示消息是否存在。如果提示消息需要半秒钟才出现,像 toBeVisible() 这样的断言会等待并在需要时重试。
🌐 Assertions are a way to verify that the expected result and the actual result matched or not. By using web first assertions Playwright will wait until the expected condition is met. For example, when testing an alert message, a test would click a button that makes a message appear and check that the alert message is there. If the alert message takes half a second to appear, assertions such as toBeVisible() will wait and retry if needed.
// 👍
await expect(page.getByText('welcome')).toBeVisible();

// 👎
expect(await page.getByText('welcome').isVisible()).toBe(true);
不要使用手动断言
🌐 Don't use manual assertions
不要使用未通过 expect 等待的手动断言。在下面的代码中,await 在 expect 内部而不是在其之前。当使用像 isVisible() 这样的断言时,测试不会等待一秒,它只会检查定位器是否存在并立即返回。
🌐 Don't use manual assertions that are not awaiting the expect. In the code below the await is inside the expect rather than before it. When using assertions such as isVisible() the test won't wait a single second, it will just check the locator is there and return immediately.
// 👎
expect(await page.getByText('welcome').isVisible()).toBe(true);
改为使用网络优先断言,例如 toBeVisible()。
🌐 Use web first assertions such as toBeVisible() instead.
// 👍
await expect(page.getByText('welcome')).toBeVisible();
配置调试
🌐 Configure debugging
本地调试
🌐 Local debugging
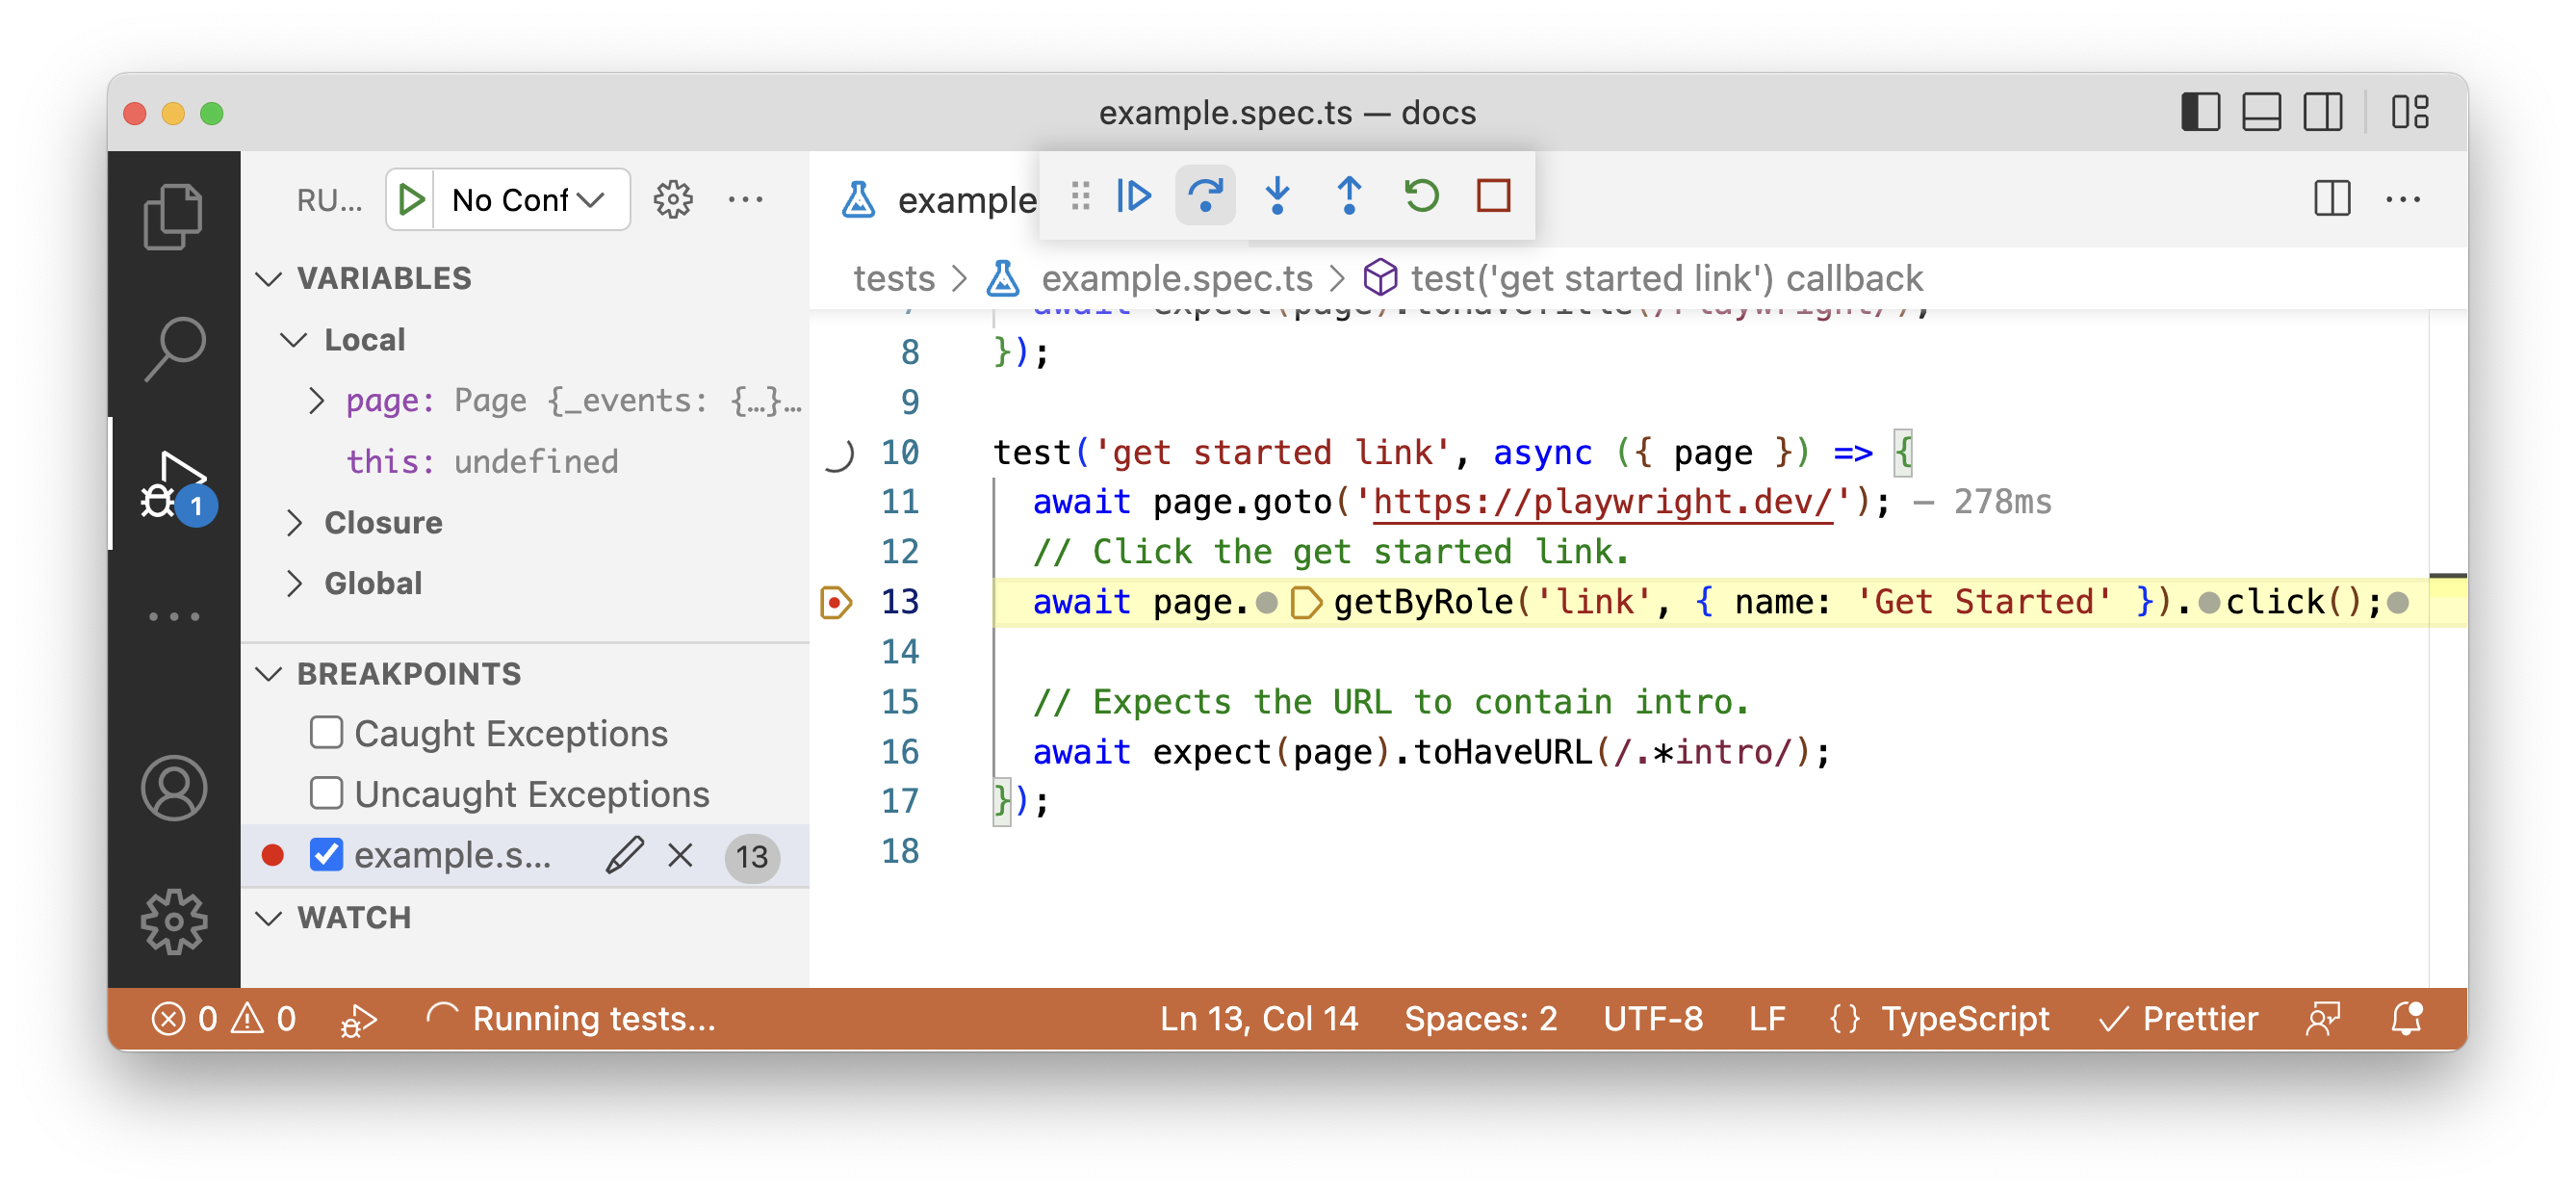
对于本地调试,我们建议你通过安装 VS Code 扩展 在 VS Code 中实时调试你的测试。你可以通过右键点击要运行的测试旁边的行来以调试模式运行测试,这将打开一个浏览器窗口并在设置断点的位置暂停。
🌐 For local debugging we recommend you debug your tests live in VS Code by installing the VS Code extension. You can run tests in debug mode by right-clicking on the line next to the test you want to run which will open a browser window and pause at where the breakpoint is set.
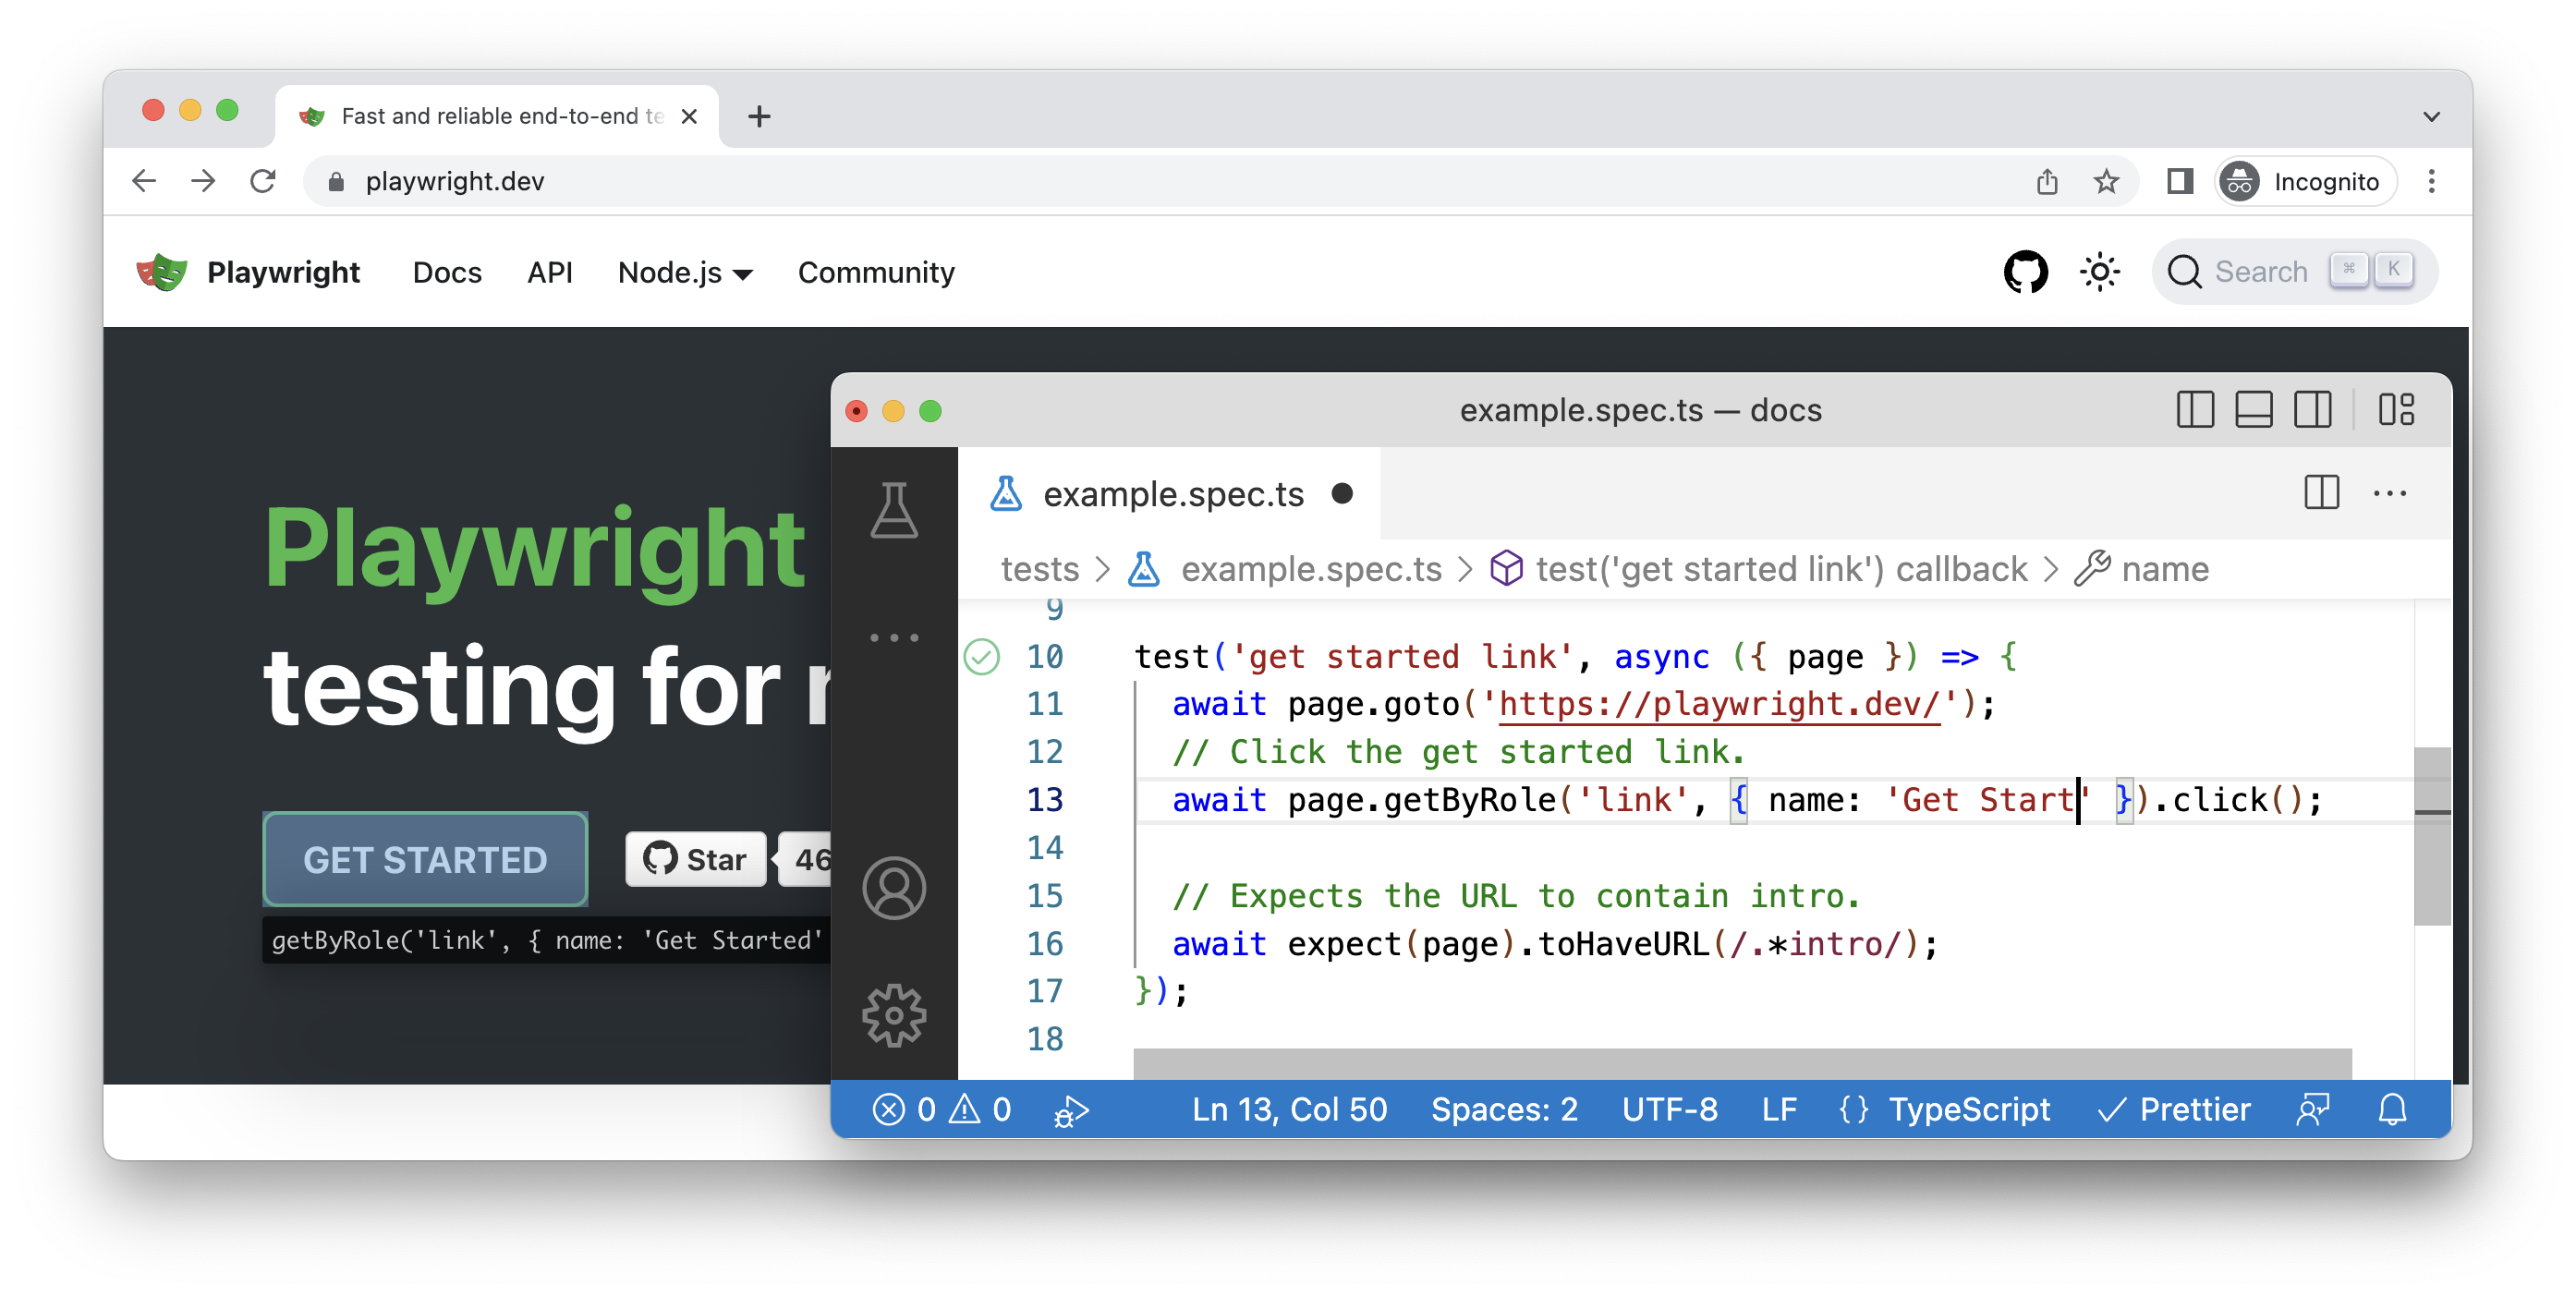
你可以通过在 VS Code 中单击或编辑测试中的定位器来实时调试测试,这将在浏览器窗口中高亮该定位器,并显示在页面上找到的任何其他匹配定位器。
🌐 You can live debug your test by clicking or editing the locators in your test in VS Code which will highlight this locator in the browser window as well as show you any other matching locators found on the page.
你还可以通过使用 Playwright 检查器来调试你的测试,只需使用 --debug 标志运行你的测试即可。
🌐 You can also debug your tests with the Playwright inspector by running your tests with the --debug flag.
- npm
- yarn
- pnpm
npx playwright test --debug
yarn playwright test --debug
pnpm exec playwright test --debug
然后,你可以逐步执行测试,查看可操作性日志,并实时编辑定位器,同时在浏览器窗口中看到高亮显示。这将显示哪些定位器匹配,以及它们的数量。
🌐 You can then step through your test, view actionability logs and edit the locator live and see it highlighted in the browser window. This will show you which locators match, how many of them there are.
要调试特定测试,请在测试文件名称和测试行号后添加 --debug 标志。
🌐 To debug a specific test add the name of the test file and the line number of the test followed by the --debug flag.
- npm
- yarn
- pnpm
npx playwright test example.spec.ts:9 --debug
yarn playwright test example.spec.ts:9 --debug
pnpm exec playwright test example.spec.ts:9 --debug
CI 调试
🌐 Debugging on CI
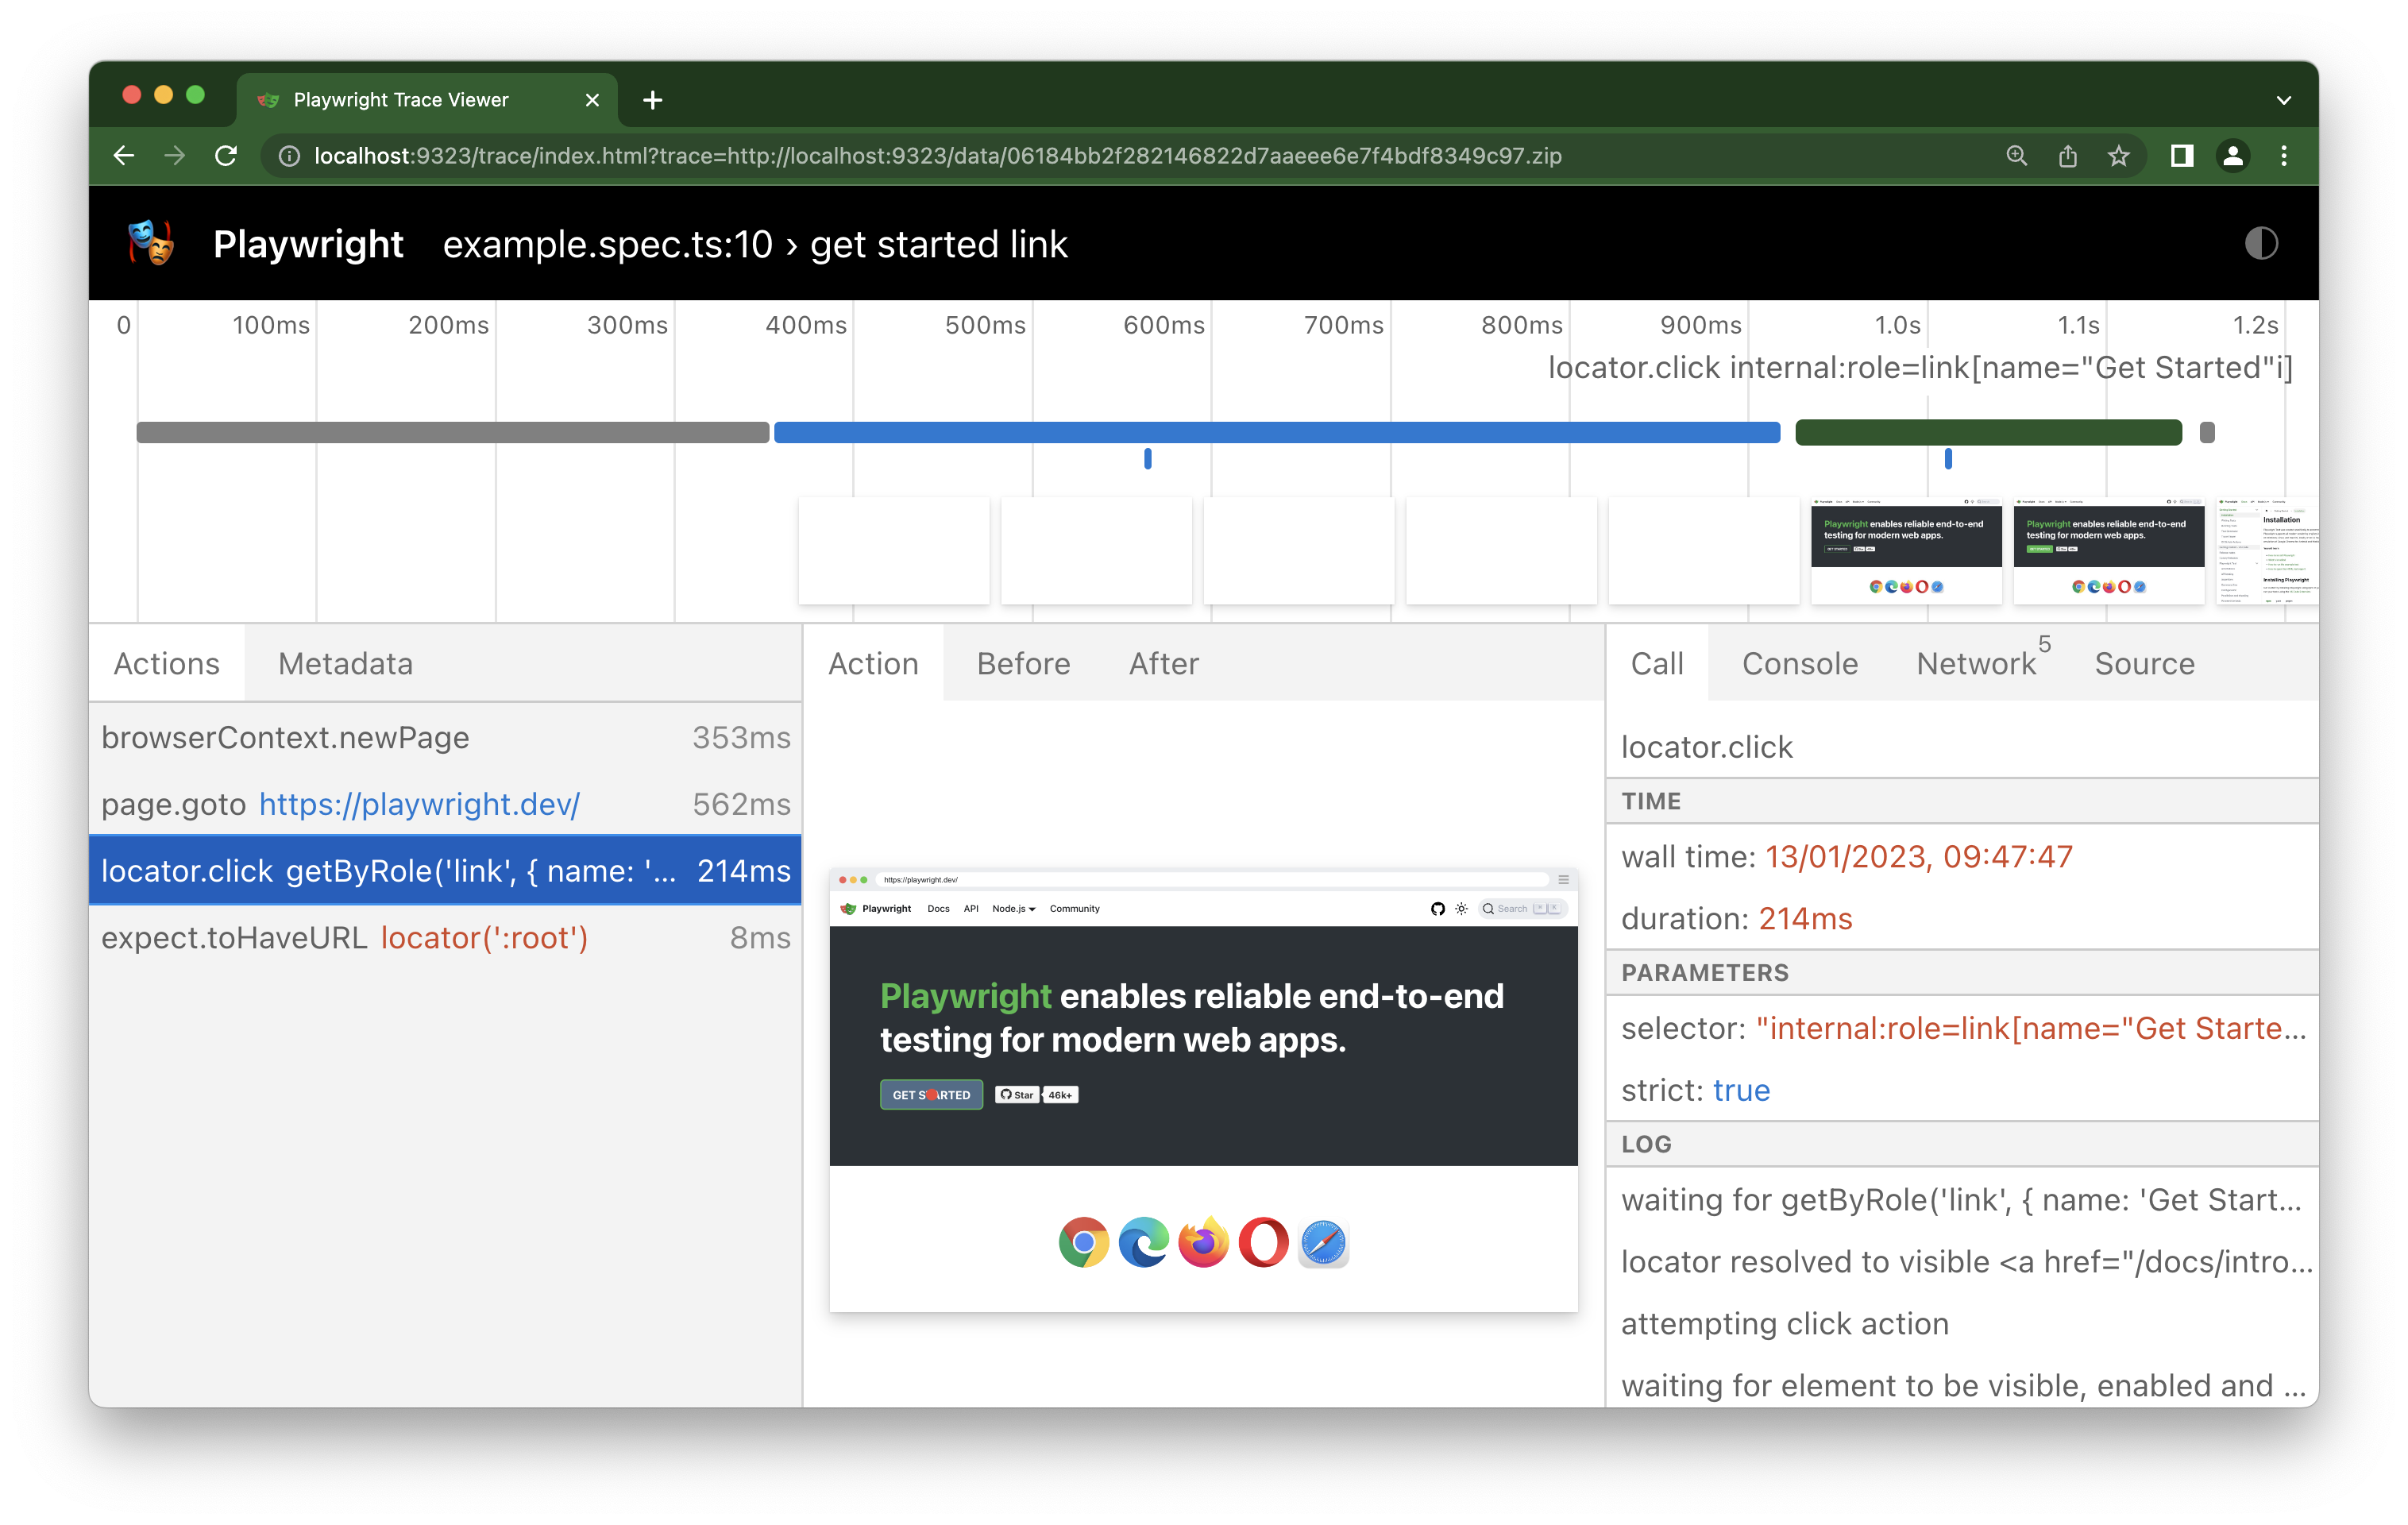
对于 CI 失败,请使用 Playwright trace viewer 而不是视频和截图。trace viewer 为你的测试提供完整的跟踪,以本地渐进式网页应用(PWA)的形式渲染,且可以轻松分享。使用 trace viewer,你可以查看时间线、使用开发者工具检查每个操作的 DOM 快照、查看网络请求等内容。
🌐 For CI failures, use the Playwright trace viewer instead of videos and screenshots. The trace viewer gives you a full trace of your tests as a local Progressive Web App (PWA) that can easily be shared. With the trace viewer you can view the timeline, inspect DOM snapshots for each action using dev tools, view network requests and more.
跟踪在 Playwright 配置文件中进行配置,并且设置为在 CI 上在失败测试的第一次重试时运行。我们不建议将其设置为 on 来让每个测试都运行跟踪,因为这会对性能造成很大影响。不过,在开发过程中,你可以使用 --trace 标志本地运行跟踪。
🌐 Traces are configured in the Playwright config file and are set to run on CI on the first retry of a failed test. We don't recommend setting this to on so that traces are run on every test as it's very performance heavy. However you can run a trace locally when developing with the --trace flag.
- npm
- yarn
- pnpm
npx playwright test --trace on
yarn playwright test --trace on
pnpm exec playwright test --trace on
运行此命令后,每次测试的跟踪都会被记录下来,并且可以直接从 HTML 报告中查看。
🌐 Once you run this command your traces will be recorded for each test and can be viewed directly from the HTML report.
- npm
- yarn
- pnpm
npx playwright show-report
yarn playwright show-report
pnpm exec playwright show-report
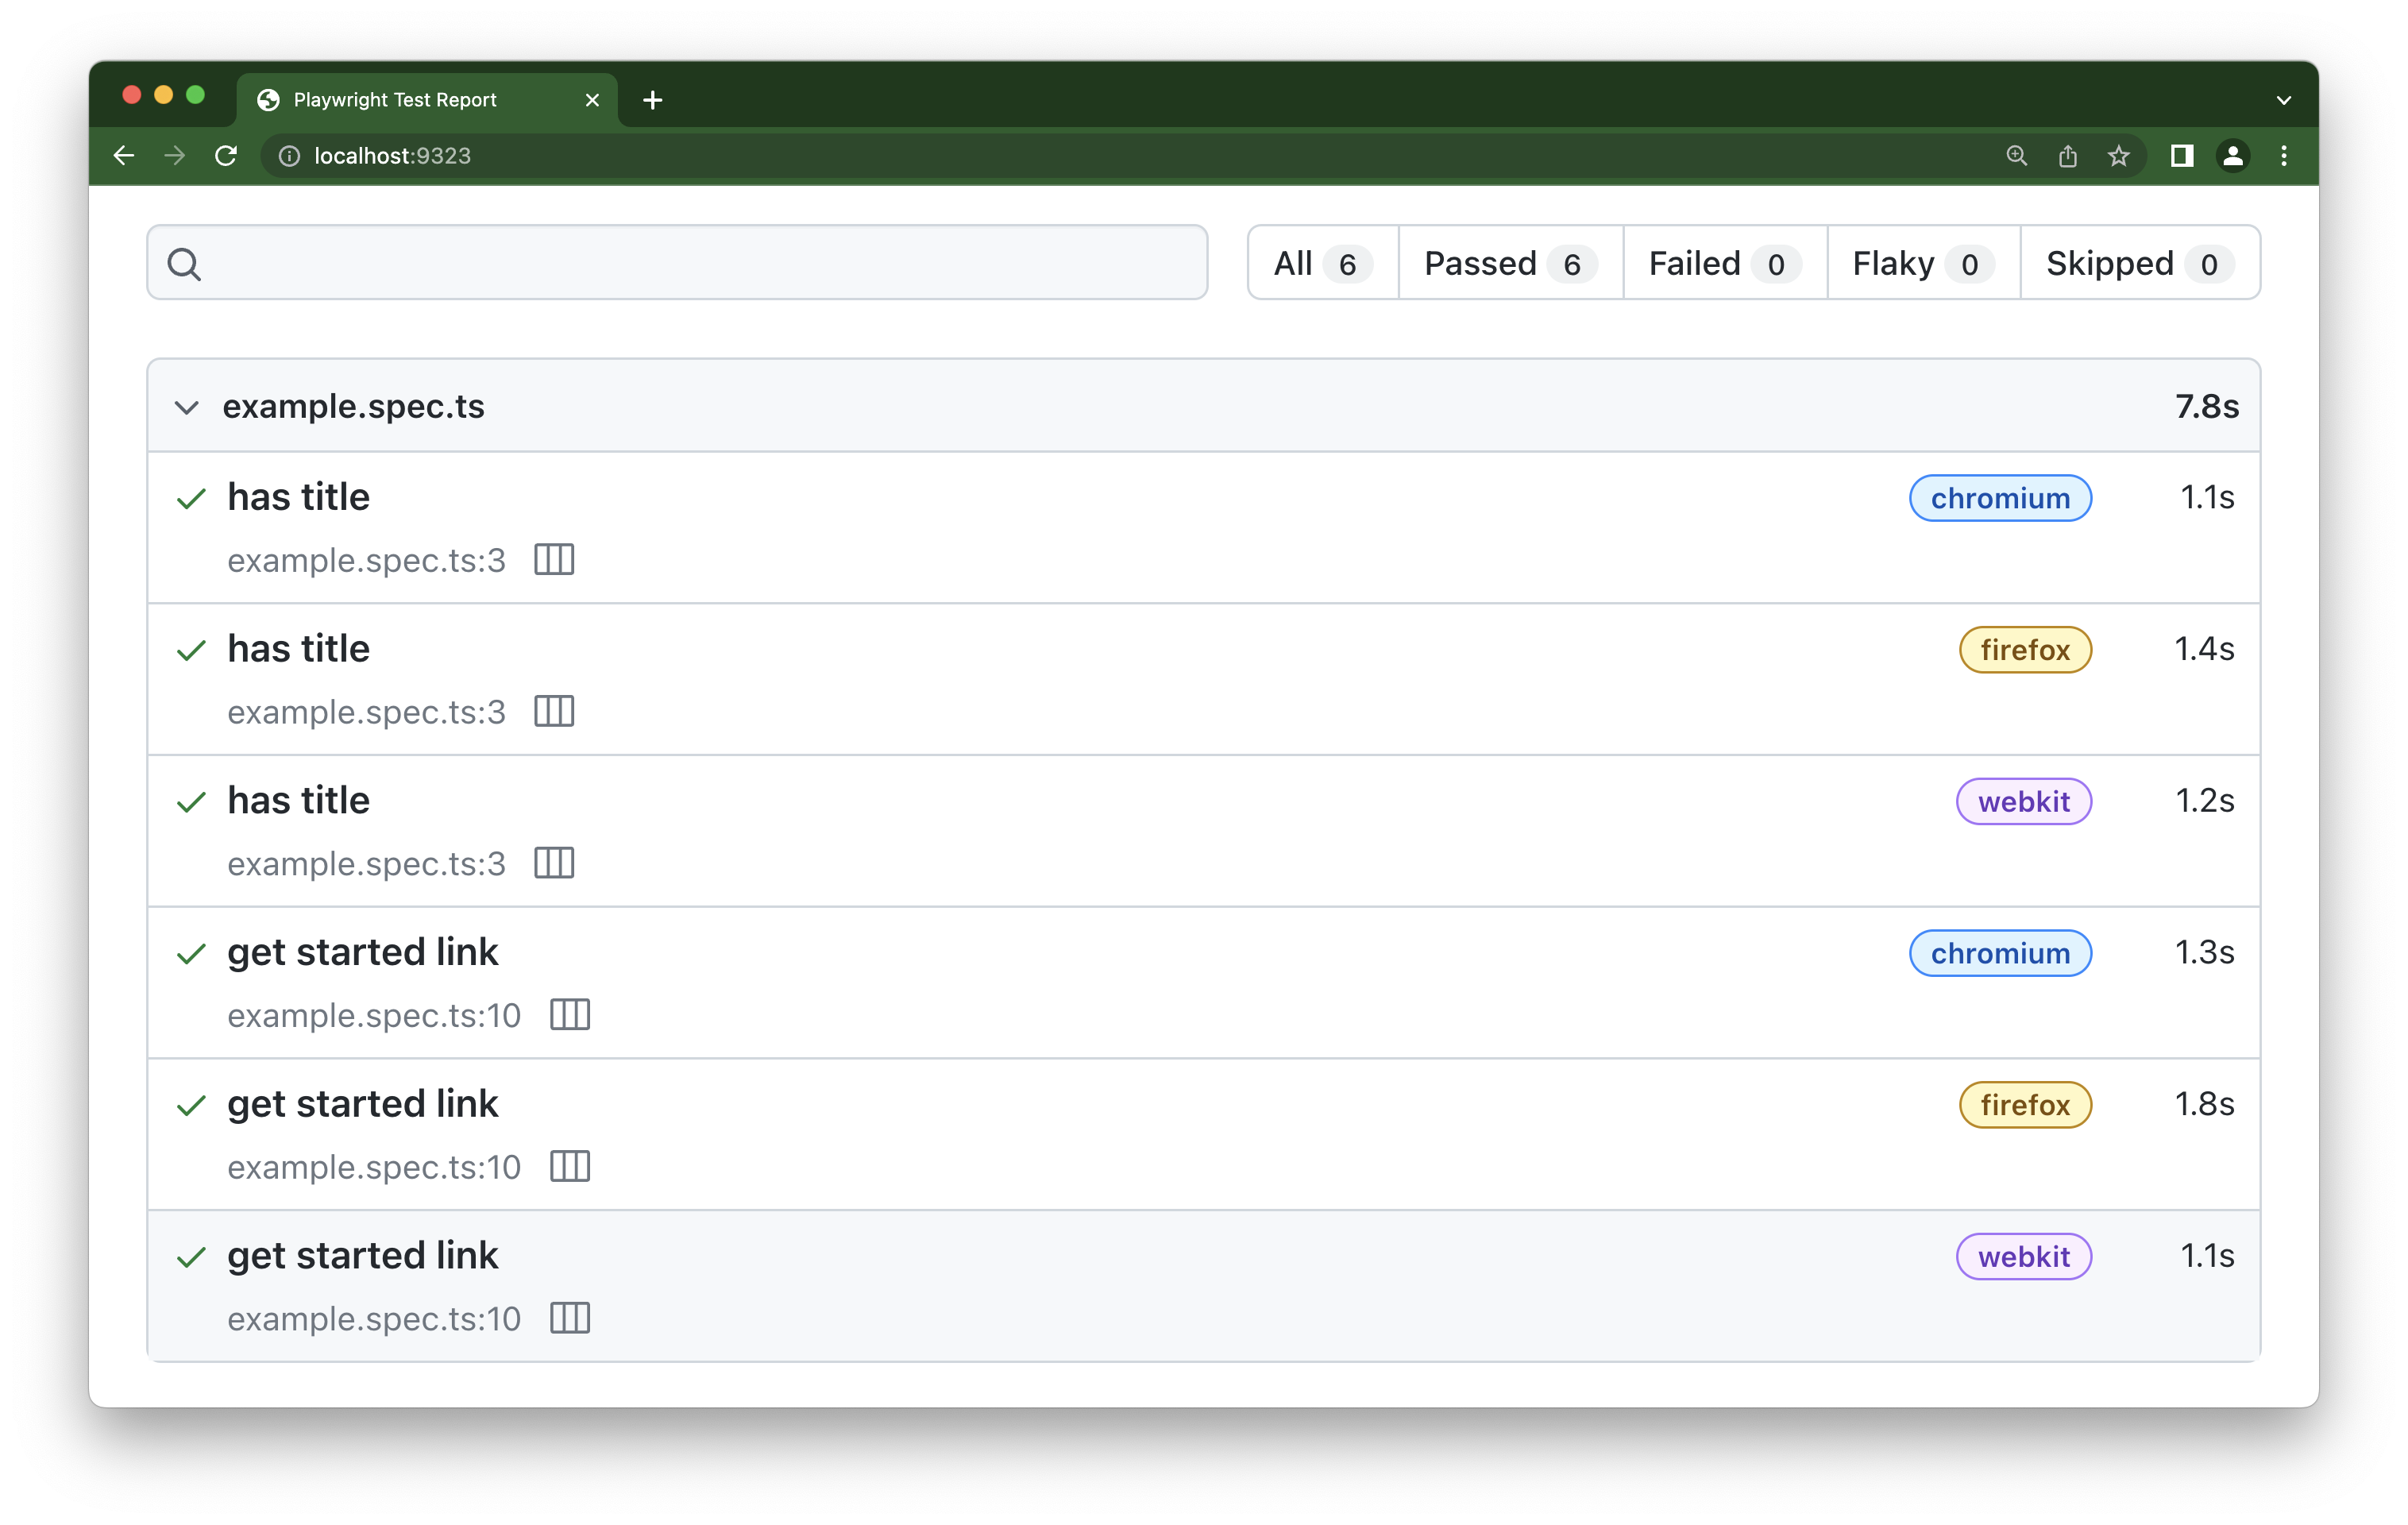
可以通过单击测试文件名旁边的图标或打开每个测试报告并向下滚动到跟踪部分来打开跟踪。
🌐 Traces can be opened by clicking on the icon next to the test file name or by opening each of the test reports and scrolling down to the traces section.

使用 Playwright 的工具
🌐 Use Playwright's Tooling
Playwright 附带了一系列工具来帮助你编写测试。
🌐 Playwright comes with a range of tooling to help you write tests.
- VS Code 扩展 在编写、运行和调试测试时为你提供了出色的开发者体验。
- 测试生成器 可以为你生成测试并选择定位器。
- 追踪查看器 为你提供了完整的测试追踪,作为本地 PWA,易于共享。使用追踪查看器,你可以查看时间线、检查每个操作的 DOM 快照、查看网络请求等。
- UI 模式 让你可以以时间旅行的方式探索、运行和调试测试,并带有观察模式。所有测试文件都会加载到测试侧边栏中,你可以展开每个文件和 describe 块,单独运行、查看、观察和调试每个测试。
- 在 Playwright 中,TypeScript 开箱即用,并为你提供更好的 IDE 集成。你的 IDE 会显示所有可执行操作,并在你操作错误时进行高亮提示。不需要 TypeScript 经验,你的代码也不必使用 TypeScript,只需使用
.ts扩展名创建测试即可。
在所有浏览器上进行测试
🌐 Test across all browsers
Playwright 使你可以轻松地在所有browsers上测试你的网站,无论你使用什么平台。在所有浏览器上进行测试可以确保你的应用对所有用户都可用。在你的配置文件中,你可以设置项目,添加名称以及使用的浏览器或设备。
🌐 Playwright makes it easy to test your site across all browsers no matter what platform you are on. Testing across all browsers ensures your app works for all users. In your config file you can set up projects adding the name and which browser or device to use.
import { defineConfig, devices } from '@playwright/test';

export default defineConfig({
  projects: [
    {
      name: 'chromium',
      use: { ...devices['Desktop Chrome'] },
    },
    {
      name: 'firefox',
      use: { ...devices['Desktop Firefox'] },
    },
    {
      name: 'webkit',
      use: { ...devices['Desktop Safari'] },
    },
  ],
});
让你的 Playwright 依赖保持最新状态
🌐 Keep your Playwright dependency up to date
通过保持你的 Playwright 版本为最新,你将能够在最新的浏览器版本上测试你的应用,并在最新的浏览器版本向公众发布之前捕获故障。
🌐 By keeping your Playwright version up to date you will be able to test your app on the latest browser versions and catch failures before the latest browser version is released to the public.
- npm
- yarn
- pnpm
npm install -D @playwright/test@latest
yarn add --dev @playwright/test@latest
pnpm install --save-dev @playwright/test@latest
查看发行说明以了解最新版本及已发布的更改内容。
🌐 Check the release notes to see what the latest version is and what changes have been released.
你可以通过运行以下命令查看你拥有的 Playwright 版本。
🌐 You can see what version of Playwright you have by running the following command.
- npm
- yarn
- pnpm
npx playwright --version
yarn playwright --version
pnpm exec playwright --version
在 CI 上运行测试
🌐 Run tests on CI
设置 CI/CD 并频繁运行测试。你运行测试的频率越高越好。理想情况下,你应该在每次提交和拉取请求时运行测试。Playwright 提供了一个 GitHub actions 工作流,这样测试就可以在 CI 上自动运行,无需额外设置。Playwright 也可以在你选择的 CI 环境 上进行设置。
🌐 Setup CI/CD and run your tests frequently. The more often you run your tests the better. Ideally you should run your tests on each commit and pull request. Playwright comes with a GitHub actions workflow so that tests will run on CI for you with no setup required. Playwright can also be setup on the CI environment of your choice.
在 CI 上运行测试时使用 Linux,因为它更便宜。开发者在本地运行时可以使用任何环境,但在 CI 上使用 Linux。可以考虑设置 Sharding 以加快 CI 速度。
🌐 Use Linux when running your tests on CI as it is cheaper. Developers can use whatever environment when running locally but use linux on CI. Consider setting up Sharding to make CI faster.
优化 CI 上的浏览器下载
🌐 Optimize browser downloads on CI
只安装你实际需要的浏览器,尤其是在持续集成(CI)环境中。例如,如果你只测试 Chromium,就只安装 Chromium。
🌐 Only install the browsers that you actually need, especially on CI. For example, if you're only testing with Chromium, install just Chromium.
# Instead of installing all browsers
npx playwright install --with-deps

# Install only Chromium
npx playwright install chromium --with-deps
这可以节省 CI 机器上的下载时间和磁盘空间。
🌐 This saves both download time and disk space on your CI machines.
检查你的测试
🌐 Lint your tests
我们建议在测试中使用 TypeScript 并结合 ESLint 进行代码检查,以便及早发现错误。使用 @typescript-eslint/no-floating-promises ESLint 规则来确保在调用 Playwright API 的异步操作前没有缺失 await。在持续集成(CI)中,你可以运行 tsc --noEmit 来确保函数以正确的签名被调用。
🌐 We recommend TypeScript and linting with ESLint for your tests to catch errors early. Use @typescript-eslint/no-floating-promises ESLint rule to make sure there are no missing awaits before the asynchronous calls to the Playwright API. On your CI you can run tsc --noEmit to ensure that functions are called with the right signature.
使用并行性和分片
🌐 Use parallelism and sharding
Playwright 默认情况下会并行运行测试。单个文件中的测试会按顺序在同一个工作进程中运行。如果你的单个文件中有许多独立的测试,你可能希望将它们并行运行
🌐 Playwright runs tests in parallel by default. Tests in a single file are run in order, in the same worker process. If you have many independent tests in a single file, you might want to run them in parallel
import { test } from '@playwright/test';

test.describe.configure({ mode: 'parallel' });

test('runs in parallel 1', async ({ page }) => { /* ... */ });
test('runs in parallel 2', async ({ page }) => { /* ... */ });
Playwright 可以将测试套件分片,以便在多台机器上执行。
🌐 Playwright can shard a test suite, so that it can be executed on multiple machines.
- npm
- yarn
- pnpm
npx playwright test --shard=1/3
yarn playwright test --shard=1/3
pnpm exec playwright test --shard=1/3
生产力技巧
🌐 Productivity tips
使用软断言
🌐 Use Soft assertions
如果你的测试失败,Playwright 会给你一个错误信息,显示测试失败的部分,你可以在 VS Code、终端、HTML 报告或跟踪查看器中看到。然而,你也可以使用 软断言。它们不会立即终止测试执行,而是在测试结束后编译并显示失败断言的列表。
🌐 If your test fails, Playwright will give you an error message showing what part of the test failed which you can see either in VS Code, the terminal, the HTML report, or the trace viewer. However, you can also use soft assertions. These do not immediately terminate the test execution, but rather compile and display a list of failed assertions once the test ended.
// Make a few checks that will not stop the test when failed...
await expect.soft(page.getByTestId('status')).toHaveText('Success');

// ... and continue the test to check more things.
await page.getByRole('link', { name: 'next page' }).click();